The user guide
Choose Wi-Fi
with more confidence.
Find Wi-Fi worth trying for your work, understand changes and keep evidence for your next visit. Start with the question that matters to you, watch the 3-minute workflow or jump to a step, and mark the steps you have tried.
Use Search site in the top menu to find pages, guides and news. Choose a result to open it directly; Find a topic below searches only this user guide.
Open a topic that helps with your next decision. Tick steps to keep your place. See the key actions in short videos.
Technical referenceUnderstand the recommendation calculation
Reproduce the component totals and understand why a promising network can still have a capped score.
Choose the weighting mode
Presence mode allocates 50 points to observed presence and 30 to measured throughput. Balanced uses 40 and 40; throughput mode uses 30 and 50. Every mode also allocates 7 to continuity, 5 to current signal, 2 to recency, 5 to authentication/encryption and 1 to radio capability. The total is 100.
Calculate presence and continuity
Presence points equal the selected presence weight multiplied by the visible fraction of monitored time. Continuity points equal 7 divided by (1 + recorded disappearances per monitored hour). Recommendation history uses the last seven days where retained. Unknown presence or continuity receives half the available points.
Interpret traffic evidence
Completed sessions on the same access point need at least 30 active seconds and 1 MB within seven days. Active averages of 1, 10 and 100 Mbps receive zero, half and all throughput points, with logarithmic interpolation and limits at the ends. Missing or insufficient evidence receives half points. This is observed aggregate adapter traffic, including local TCP and UDP, affected by application demand; it is not an internet speed test.
Read the smaller components
Signal points rise linearly from zero at −90 dBm (approximately 0/4 bars) to five at −50 dBm (approximately 4/4 bars), clamped at those limits. Unknown signal receives 2.5 points. Currently visible networks receive two recency points; otherwise those points decline linearly to zero after seven days. Authentication and cipher preferences contribute up to five points together, and PHY capability up to one. Unknown technical components receive half points. Band, channel, beacon interval and access-point uptime add no bonus.
Apply the evidence caps
Round the component sum to the nearest integer, with halves rounded upward. Ignored networks score zero; networks not currently observed are capped at 35. Currently observed networks with less than 30 monitored minutes or 10 visible minutes are capped at 60. Moderate evidence starts at both thresholds; More evidence needs 120 monitored and 60 visible minutes. These labels describe evidence quantity, not a statistical confidence interval. A score of 80 or more means Worth trying first; 60 means Worth a try; 40 means Consider with caution; lower scores have lower priority.
Check a worked total
In presence mode, 90% observed presence contributes 45 points. Two disappearances in two monitored hours contribute 3.5 continuity points. Throughput of 10 Mbps contributes 15. A current −60 dBm reading (approximately 3/4 bars) contributes 3.75; current visibility adds two. If technical details contribute four security points and 0.8 radio points, the sum is 74.05 and the rounded score is 74, provided the history cap has been lifted. Inspect the component explanation on your actual recommendation before comparing it.
Keep in mind
- The score ranks candidates to try. It is not a probability of connection success, a security audit or proof of internet access. Different access points sharing one name can have different evidence.
Technical referenceInterpret observations and sampling limits
Separate nearby visibility, connection sessions and internet checks before drawing a conclusion.
Record the observation conditions
Keep the observer in the same location and record the selected scan interval, enabled radios, retention and observation period. Operating-system scan caching, driver behavior and radio capability affect what can be observed. An interval setting is a requested cadence, not a guarantee of equally spaced fresh measurements.
Separate three questions
Presence asks whether a nearby network was observed during monitored time. Connection history asks what happened while this computer was connected. Tools check the current connection when you start them. A visible network can require credentials, have a captive portal or lack internet access.
Treat missing coverage as unknown
Sleep, application closure, disabled or unavailable adapters and incomplete scans leave gaps. They are not proof that an access point failed. Compare monitored minutes and period coverage before comparing presence percentages. Short interruptions between observations can be missed, and an observed disappearance alone cannot establish its cause.
Keep reliability thresholds separate
The connection-reliability verdict requires at least three qualifying sessions lasting a minute each and 30 observed connection minutes. This is separate from the recommendation thresholds of 30 monitored and 10 visible minutes. Neither threshold guarantees that the sample represents every working hour or location.
InvestigationsChoose reliable office Wi-Fi
Build a repeatable shortlist using comparable observation periods, then test the connection you can actually use.
Define the comparison
Choose a desk or work area, working hours and several representative days. Keep the observer in that location and enable persistent history with enough retention. Note candidate network names and access-point identities in Profiles so similarly named access points stay distinguishable.
Collect comparable coverage
Leave observation running through the planned hours. In Statistics, compare the same time range and check monitored minutes and coverage before interpreting presence, interval lengths and disappearances. Repeat a period with poor monitoring coverage instead of counting the missing time as an outage.
Shortlist and try
Open Recommendations and inspect each candidate’s evidence and score components. Connect only to a network you are authorized to use. Review connection sessions and run the relevant Tools checks during normal work; a nearby visibility score alone cannot establish internet performance.
Keep a decision record
Export Statistics and connection evidence with the selected range. Record location, observation hours, access-point identity and any gaps alongside the report. Choose a candidate supported by both consistent observations and your actual connection experience; repeat after a material change.
Confirm the result
- You have a shortlist with comparable coverage and a report explaining the choice and its limits.
InvestigationsInvestigate intermittent disconnections
Build a timeline that distinguishes a connection loss, a scan gap and an internet problem.
Capture the context
Note the approximate local time, selected network and access point, location and symptom. Preserve Activity Log and connection history. Avoid deleting records or shortening retention while investigating.
Align the evidence
Filter Activity Log around the incident and inspect connection changes, adapter status and monitoring interruptions. Compare the same interval in Statistics and connection history. A scan disappearance without a connection change is different from this computer disconnecting; a sleep or disabled-radio gap is unknown coverage.
Check the current symptom
When the problem recurs, use Tools to examine the current connection and DNS as appropriate. Record when each test ran: a successful later check does not disprove an earlier interruption. Review automatic-switch settings and logged outcomes if the app attempted to change networks.
Retain a useful incident report
Export the relevant Activity Log rows and Statistics range. Include app and operating-system versions, timestamps with time zone, actions and observed results. Remove identifying names, addresses, paths and notes before sharing. Report the symptom even if the evidence cannot establish a root cause.
InvestigationsCompare two access points over several days
Compare equal windows without turning missing observations into supposed outages.
Identify both access points
Record the BSSID or displayed identity for each candidate. A shared SSID does not make two access points the same item. Keep the observer location, scanning settings and planned hours consistent.
Inspect each day’s coverage
Select matching daily windows in Statistics. Compare monitored minutes and period coverage first, then observed presence and disappearances. Mark periods when the computer slept, the app stopped or an adapter was unavailable as unobserved.
Compare patterns and connections
Use time patterns and side-by-side comparisons to look for repeated differences. Keep nearby visibility separate from actual connection sessions. If you try both access points, record which one was connected and what work was performed; different traffic demand can change throughput evidence.
Publish the bounded conclusion
Export the same range for both candidates and retain coverage values with the charts. State what was observed at that location during those hours. More visibility does not prove uninterrupted service, and missing coverage cannot establish an outage.
Technical referenceRead Statistics report fields
Interpret the numeric Item statistics table alongside its charts and selected time range.
Identify the row
Item is the displayed name; Identity is the recorded item key. Use the identity when names are shared. The selected report period clips intervals at its boundaries.
Read duration and coverage
Presence minutes is recorded visible time. Monitored minutes is the available monitoring denominator. Observed presence is presence minutes divided by monitored minutes; Period coverage is monitored minutes divided by the selected period’s elapsed minutes. The workbook displays these fractions as percentages. Empty evidence values mean unknown, not zero.
Read losses and intervals
Disappearances counts recorded losses in the selected range; Disappearances per monitoring hour divides that count by monitored hours. Longest interval minutes is the longest visible interval after clipping. Longest interval evidence states Complete or Incomplete / clipped; a boundary-clipped interval is not a completed session.
Interpret the distribution
Complete intervals counts completed visible intervals used for the duration distribution. Median complete minutes and 90th percentile complete minutes use linear interpolation between sorted completed durations. They describe recorded visibility intervals, not connection session lengths. Keep these numeric rows with the charts; chart display limits do not truncate the numeric Item statistics report.
Technical referenceUnderstand Windows and Linux differences
Use the common analysis workflow while checking the integrations supplied by your operating system.
Use the shared analysis
Both platforms use common observation, recommendation, statistics, report and saved-data rules. Available radio details depend on the adapter, driver and operating-system interfaces; unsupported fields remain unknown. A matching screen does not prove identical hardware support.
Check the native integrations
Windows uses Windows networking, desktop notification and MSIX installation services. Linux uses NetworkManager and BlueZ, a graphical desktop with XWayland, and native DEB, RPM or Arch packages. Linux tray behavior depends on a tray host; GNOME needs an enabled AppIndicator/KStatusNotifierItem extension. Linux global shortcut availability depends on the desktop portal and session.
Match the package to your system
Choose the package matching your distribution and processor on Get the app. x64 packages are for Intel/AMD 64-bit computers; ARM64 packages are for 64-bit Arm computers. Follow the requirements and installation command shown on the package card.
Technical referenceBack up and move saved observations
Preserve the complete local data set and keep a rollback copy when moving it.
Locate the data
The app stores data in a HotspotObserver directory beneath the current user’s local application-data directory. On Linux this is normally ~/.local/share/HotspotObserver. On packaged Windows the local-data location can be redirected under the package’s per-user storage; do not assume another account’s or an unpackaged app’s path is the active one. Identify the directory containing the app’s saved files before copying.
Take a consistent backup
Enable the persistence you need and exit the app normally so pending writes finish. Copy the whole data directory to a private backup location. The shared files are options.json (preferences), devices.json (Bluetooth profiles), networks.json (Wi-Fi profiles), activity-log.json (retained observations) and connected-networks.json (connection sessions). An Excel export is a report, not a complete restorable data backup.
Move with a rollback copy
Use the same app version initially. Exit both instances, back up the destination, then copy the saved data into its active data directory with permissions restricted to its owner. Keep the source and destination backups. Shared formats do not make saved system Wi-Fi credentials, adapter identities, desktop permissions or operating-system settings portable.
Verify before removing anything
Start the destination and inspect profiles, notes, options, retained history and connection records. Review platform-specific settings and system network profiles separately. Earlier Linux ubuntu-observations.json data migrates to the shared files with its original retained as a backup. Do not merge JSON files by hand or delete the source until the result is verified.
Keep in mind
- Saved observations can contain identifying network names, device addresses, notes and timestamps. Keep backups private and preserve originals before testing a migration.
Start hereInstall on your Linux distribution
Choose the native package for your desktop, then compare Wi-Fi stability with the same Linux app.
Before you start
- Experimental x64 and ARM64 packages cover Debian/Ubuntu and compatible derivatives, Fedora, openSUSE and Arch-based desktops. Choose the matching distribution and architecture on Get the app; its installer cards show the published version.
- Use a graphical desktop with NetworkManager, BlueZ and XWayland. Your package manager adds required libraries; administrator access and internet access are needed for initial installation. The publisher is Vitalie Vrabie. Some local-file installer previews leave the author field blank; the package description also identifies the publisher.
Choose the package
Open Get the app → Linux. Choose x64 for Intel/AMD 64-bit processors or ARM64 for 64-bit Arm processors, then check the supported distribution list on each package card. Each installer link stays the same across releases; its adjacent VirusTotal URL report button opens the scan for that exact address. Select .deb for Debian 12 and later or Ubuntu 22.04 and later on either architecture, or Linux Mint 21 and later on x64; Fedora .rpm for Fedora Workstation or Fedora KDE Plasma Desktop; openSUSE .rpm for openSUSE Leap 16 or openSUSE Tumbleweed; or .pkg.tar.zst for Arch Linux, EndeavourOS or Manjaro on x64, or Arch Linux ARM and compatible Manjaro ARM desktops on ARM64. All packages are experimental. The two RPM variants declare different dependencies; choose the matching distribution. Version 5.9.5.0 beta corrects the openSUSE graphics-library requirements. If YaST reports an unavailable graphics dependency for an older package, cancel that installation and obtain the current openSUSE installer; do not ignore the dependency warning.
Install and start
Follow the command shown beside your package to install it with dependencies. Open Hotspot Observer from the application menu, read the complete offline beta agreement, tick acceptance and choose Accept and continue to begin observing.
Verify Linux packages
Version 5.10.2.0 beta signs every Linux installer: Debian/Ubuntu, Fedora, openSUSE and Arch, on x64 and ARM64. Save the package, matching .sig file and public signing key from Get the app in the same folder, with their original filenames. Check the full key fingerprint in the signing guidance, then run the card’s verification and installation command. Debian uses GnuPG; install gnupg with apt first if it is unavailable. RPM and Arch use their native key tools. Key setup is needed once per computer. A signature failure means the package must not be installed. In-app updates keep their existing one-click flow.
Find the tray icon
Version 5.10.2.0 beta improves tray registration and icon discovery on Linux, including Fedora and Debian. The app registers when a tray host starts and registers again after a desktop-shell restart. KDE Plasma provides tray support; GNOME needs an enabled AppIndicator and KStatusNotifierItem Support extension. Version 5.11.0.0 beta declares tray-support recommendations in Debian/Ubuntu and Fedora packages, and a GNOME optional dependency in Arch packages. Debian/Ubuntu accepts an existing Plasma or Cinnamon tray provider instead. Open Extensions and enable AppIndicator support on GNOME; if the newly installed extension is not listed, sign out and back in first. Package installation preserves your extension settings. The openSUSE RPM does not add a GNOME tray extension; use an enabled compatible tray host or keep the application window open. In that release, the Ubuntu application window returns if its tray icon disappears. If your desktop has no tray host, keep using the application window and check Activity Log for tray status. The window reopens if a registered tray host disappears. Select the tray icon or its Open menu action to return to the app.
Keep the app current
About prepares verified updates for the installed package format. Choose Install update to install and reopen the app; your desktop may request administrator authentication. Debian/Ubuntu packages also register the signed APT update source. RPM and Arch packages do not add a system repository.
Confirm the result
- The app appears in your application menu and retains the same local history and settings across updates.
Keep in mind
- A package passing archive checks does not prove its desktop integrations or physical radios work on every distribution. Report your distribution, version and desktop session if a preview integration fails.
Start hereBuild your Wi-Fi history on Ubuntu
Compare the Wi-Fi around you and keep useful evidence on your Ubuntu desktop. Start with the experimental package, then use the same observation and comparison workflow as Windows.
Before you start
- Experimental x64 and ARM64 packages target Ubuntu 22.04 and later. Choose the package for your processor on Get the app, then follow its installation steps.
- Use the shared guides for observation, comparisons and reports. Tray actions, shortcuts and available measurements depend on your Ubuntu desktop session and hardware.
Install the package
Get the matching x64 or ARM64 Debian / Ubuntu package from Get the app → Linux. Its VirusTotal URL report lets you inspect an independent scan of the public package address. Double-click the selected .deb file, choose Install in App Center and authenticate when asked. Launch from the application menu, scroll through the offline beta agreement, tick its acceptance checkbox and select Accept and continue. If App Center cannot open the file or stays on Installing, use the command shown on the matching Debian / Ubuntu card to install the app and required libraries.
Record observations
Build evidence while you use your computer. Visible Hotspots shows nearby networks and devices; Scan now requests a Wi-Fi scan, and Options controls radio observation and scan intervals. The refresh button counts down to the next scan. Read operational messages in Activity Log → By program, choose By network or By device for item events, or by Place to group all event kinds by their recorded place. Adapters are detected automatically, so reconnecting one needs no manual selection. Incomplete scans keep uncertain observations rather than inventing losses; unavailable measurements stay unknown. Connection changes may require desktop permissions, and networks needing user authorization are excluded from automatic selection.
Review the evidence
Find the view that answers your question: Statistics compares presence and time patterns, Recommendations explains ratings, and My networks records actual connection sessions. Use Log, Statistics, Connect or Ignore beside a visible item; Profiles holds your notes and Important and Ignored markers for previously observed items. Activity Log places groups beside events. Select a Wi-Fi row to highlight its channel curve. The same ten tabs remain available in narrow windows by horizontal scrolling.
Save a report
Keep useful findings with Export or Copy. Excel workbooks retain the same columns and visual layout as Windows, including Wi-Fi detail tables and editable Statistics charts; Activity Log also offers CSV and text. Notes and observation history stay on this computer, with history retention up to 12 weeks. Ubuntu and Windows use the same saved-data and report formats; earlier Ubuntu observations migrate with their original retained as a backup.
Keep Ubuntu current
Stay current through About → Install update once a newer verified installer is ready. One selection starts the helper; the app saves, closes for installation and reopens. Startup failures show a retry message with details in Activity Log. The website’s Ubuntu installer link stays the same across releases and always provides the current package. The package also registers a signed update source for Ubuntu App Center; refresh it and choose Update when a release appears. Ubuntu may request authentication. Use App Center → Manage → Installed apps for license and Uninstall controls; reopen App Center if the new app is missing. The local package preview may still show Unknown for license. Single or double click the tray icon to reopen the app; its menu offers Open, connection controls and Quit. Your maximized and tray-hidden states are remembered, and the window stays visible if no tray is available.
Recognize preview limits
Use Tools for speed, DNS, latency and route checks when you need clues about the current connection. Options and the tray share the automatic-reconnection setting; a failed switch tries to recover the previous connection. In About, the update icon or F5 refreshes News and checks for updates, with status and transfer progress beside it. Options links to your desktop language settings. Feedback keeps your answers and fills in your Ubuntu release. Adapter drivers, permissions and desktop support can limit measurements, so use the preview’s results alongside your own connection experience.
Keep in mind
- Keep the preview open while observing. Desktop sessions, adapter drivers and permissions can affect available evidence. It does not guarantee internet access or future stability.
Start hereMake your first informed Wi-Fi choice
Start a history where you actually use Wi-Fi, then find the evidence that helps you choose a network for your day.
Before you start
- Use a Windows or Ubuntu computer with Wi-Fi or Bluetooth enabled. Hotspot Observer supports Windows 10 build 19041 or later and Windows 11; see the Ubuntu topic for experimental package requirements.
- Need the app first? Choose Windows or Linux · Ubuntu on the Get the app page linked above, then follow its installation steps.
Restore the window
Keep observations going without keeping a window in your way. Click the tray icon once or twice, or right-click → Open, to restore the app. An already visible window stays open, and monitoring continues while it is hidden.
Allow Windows access
Give the app access to the evidence you need: enable Wi-Fi or Bluetooth observation in Options and allow requested system access. Windows Wi-Fi scanning may need location access. Ubuntu users can follow the Ubuntu topic for desktop permission and setup details.
Look at Visible Hotspots
Find your candidates in Visible Hotspots. Search, select a radio view and adjust the minimum-signal filter to narrow the nearby list. Wi-Fi networks are hotspots; Bluetooth items are devices.
Keep useful history
Keep enough evidence for your next decision: enable persistent Activity Log history in Options and choose retention covering your comparison period. Leave the app running where and when you normally use Wi-Fi; it cannot recover observations from before it was running.
Choose the next screen
Start with Recommendations for a rated Wi-Fi shortlist, then use Statistics to check the supporting history. My networks describes connections you actually used, and Tools checks the current connection. In Options, choose whether the app should reconnect or switch to better-rated available Wi-Fi you can access.
Confirm the result
- You can see nearby items and find their events in Activity Log.
- You know that the nearby list is a current observation and that stability needs history.
Keep in mind
- Visibility does not establish internet access, speed, security or connection uptime. A brief observation gives limited evidence.
See this screen in the app
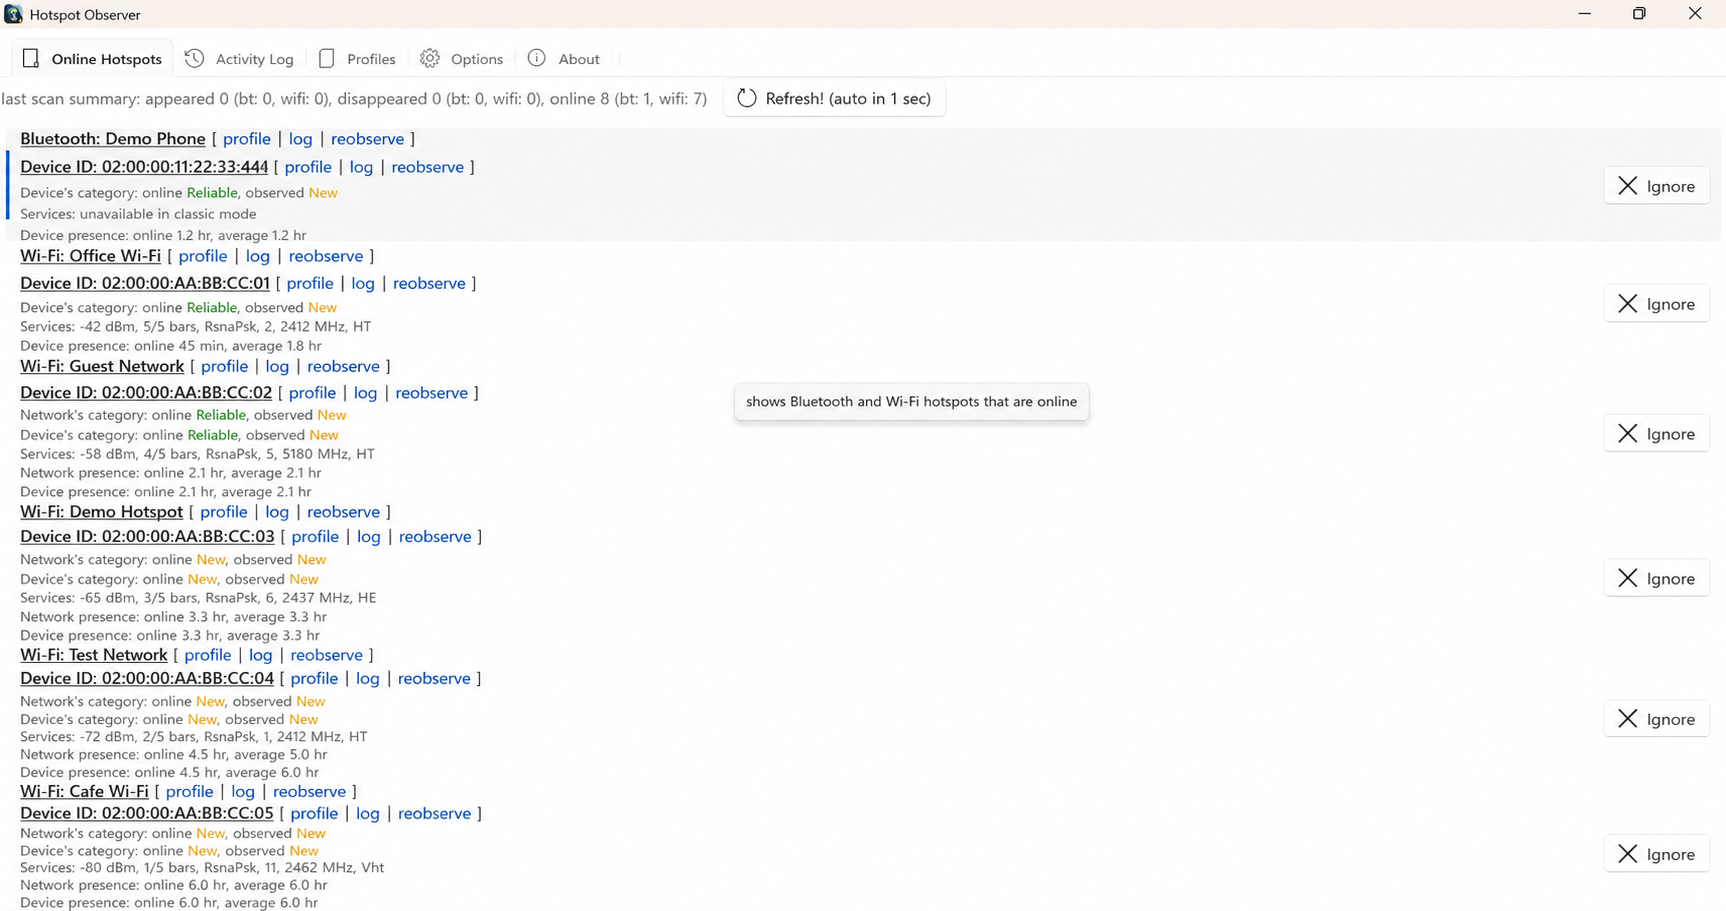
Start hereRead the nearby list
Find a network you could use, understand its current reading and inspect the details before deciding what to try.
Find a network or device
Find the item you need by clearing search and signal filters if it is missing, then check Ignored items. When search or minimum-signal filters leave a list empty, a search-icon card says “No entries match your filter”. Change or clear the filter to see entries again. The same guidance appears for empty search results in Activity Log and Profiles. Order Wi-Fi by rating or signal to suit your comparison; Bluetooth devices appear only in signal ordering.
Read the signal
Use the measured reading and approximate four-bar rating to judge current signal. Less negative means stronger. Try the slider below to connect the values to the bars, then compare history before assuming a strong reading will last.
Compare channel usage
See which nearby networks share center channels in the diagram beside the list. Choose a band; search and minimum-signal filters affect both panes. Select a Wi-Fi row to highlight its curve and band, or a colored legend button to reveal its row. The legend follows list ordering, and tooltips retain full names when labels are crowded. Signal-axis values include their bars. Narrow windows stack the panes. Curve widths are illustrative: actual channel width and airtime usage are unknown. Networks lacking channel or signal are counted separately; Bluetooth stays in the list.
Expand the technical evidence
Check the facts behind a candidate in Technical details and services. Available fields include SSID/BSSID, RSSI with bars, system signal bars, frequency, derived band and center channel, PHY, authentication, encryption, network kind, Wi-Fi Direct, beacon interval, AP uptime and scan adapter/time. Expanded details remain open during updates. Unknown fields stay unknown; center channel does not establish width. AP uptime uses days, hours, minutes and seconds, such as 1d 2h 3m 4s, and measures the access point rather than your connection duration.
Follow recorded details
Keep context for a later comparison: profiles, Activity Log groups, Recommendations and Statistics retain available technical evidence. Last observed details refer to the earlier observation. Visible Hotspots, Profiles and Details reports keep separate radio columns and a band comparison with numeric bars; unsupported model, firmware and channel-width fields remain unknown.
Open the evidence
Follow a concern straight to its evidence with Log or Statistics on the item. Mark it Important when you want relevant filters and notification rules to recognize it.
Handle stale observations
When an adapter is missing or off, keep working with the radios that are available. A notice replaces unavailable results only while that radio’s monitoring option is enabled. Its Turn off Wi-Fi monitoring or Turn off Bluetooth monitoring link unticks the option and hides the warning; you can re-enable observation in Options. History is preserved, gap time is excluded from reliability and loss counts, and observation resumes when the adapter returns. After laptop sleep, interrupted scans end and the app requests fresh observations automatically; sleep is a monitoring gap, not a network loss. The app does not turn radios on. Incomplete scans keep missing items uncertain rather than recording false losses. Bluetooth service visibility can depend on the device being awake, connected or in a particular mode.
Keep in mind
- Online and observed categories describe observation evidence. They are not a guarantee of a working internet connection.
- Version 5.10.7.0 beta corrects tab rendering while preserving selections and history. Earlier affected versions required restarting the app after content disappeared; switching tabs or resizing did not restore it.
WalkthroughsChoose Wi-Fi for the work you need to do
Make a more informed Wi-Fi choice by checking which networks stayed visible where you work. Compare their recorded history and ratings, then try an accessible candidate with your real tasks.
Before you start
- Run Hotspot Observer in the place and during the hours where you plan to use Wi-Fi.
- Keep Activity Log persistence enabled long enough to capture repeated appearances and disappearances.
- Confirm that Windows has saved credentials for any secured network you may ask the app to choose.
Build useful history
Give your choice a useful basis by leaving the app running where and when you normally use Wi-Fi. Repeated observations let you compare presence over time; short or old records receive limited scores.
Open Recommendations
Start your shortlist in Recommendations, where Wi-Fi networks are ranked from 0 to 100 with their points explained. In Options → Wi-Fi rating priorities, choose Presence first (50% presence / 30% throughput, the default), Balanced (40% / 40%) or Throughput first (30% / 50%). Supporting factors share 20%: disappearances 7, signal 5, recency 2, authentication/encryption 5 and radio capability 1. Throughput uses recent completed sessions on the same access point after 30 active seconds and one MB; missing evidence receives half the selected throughput weight. Active averages of 1, 10 and 100 Mbps receive zero, half and full throughput points on a logarithmic scale. Limited history is capped at 60 and absent networks at 35. Your priority applies to nearby ratings, Recommendations and automatic choices.
Compare technical capabilities
Use technical points as supporting evidence when comparing otherwise similar candidates. WPA2/WPA3, modern encryption and newer PHY capability receive modest preference. Signal and technical points use the strongest currently observed access point; missing fields are neutral. Band, channel, beacon interval and AP uptime alone add no quality bonus, and these details do not establish trust or available internet speed.
Inspect a candidate
Check whether a promising network stayed visible during the hours you need. Choose its Statistics action and compare presence, gaps, disappearances and signal with bars over the same period. Add up to five Wi-Fi networks to compare them together.
Connect or re-choose
Try a network you can access: Connect opens Windows Wi-Fi connections. For an automatic choice, use Re-choose Wi-Fi intelligently in the tray or your configured shortcut. It scans and switches only to a strictly higher-rated visible network your system can join with saved credentials, or to an open network.
Test the real connection
Before relying on your choice, try the work you intend to do. Ratings combine observed presence, actual traffic and supporting factors; passive traffic includes local use and does not measure spare capacity. Scores cannot guarantee latency, internet access, security or future uptime. Switching can briefly interrupt connectivity.
Confirm the result
- You can explain why the leading network scored higher using presence ratio, measured throughput, disappearances, signal, recency and recorded technical capabilities.
- You compared candidates over the same period instead of relying on one current signal reading.
- You tested the chosen connection for the real work you intend to do.
Keep in mind
- A score combines presence ratio and measured throughput with smaller supporting factors; it does not establish available capacity, latency, internet access, security or guaranteed connectivity.
- Scores capped for limited history or a network that is not currently visible should be treated as provisional.
See this screen in the app
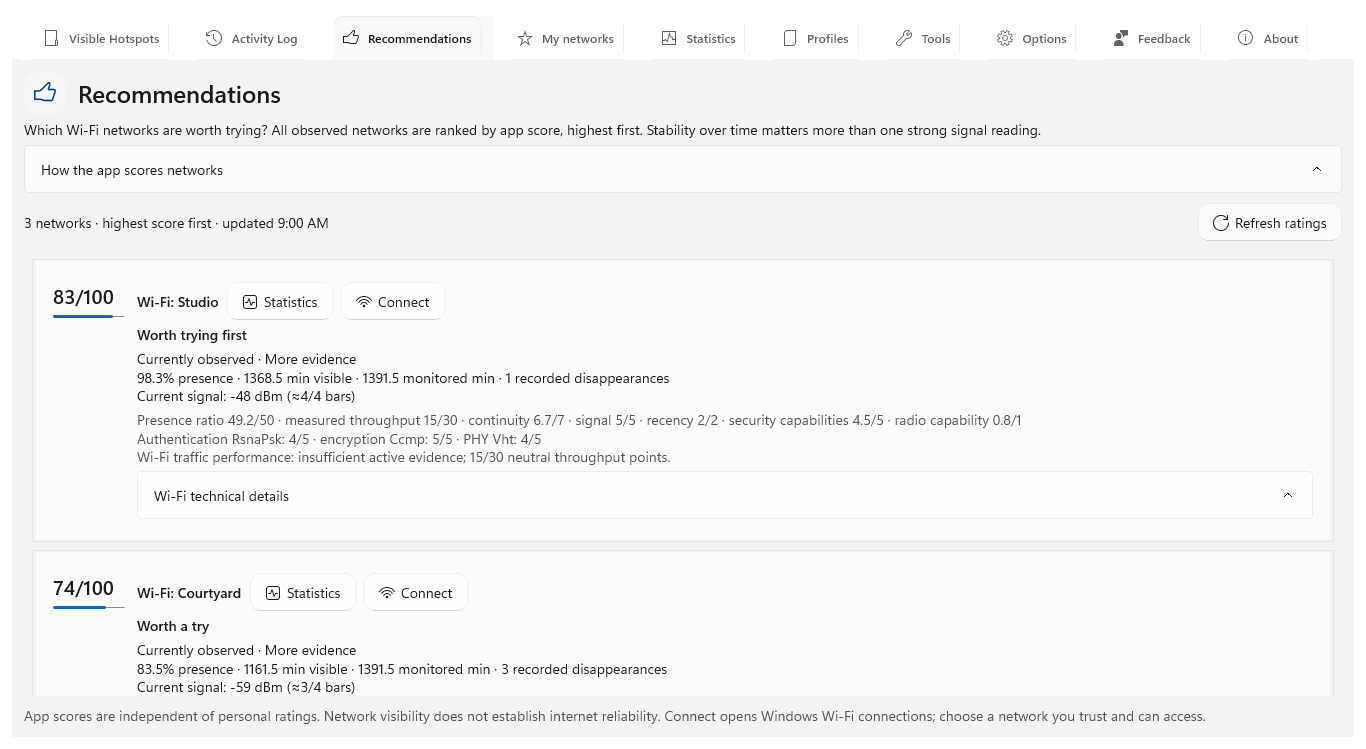
WalkthroughsSee which nearby Wi-Fi networks share channels
Understand the radio layout around your workspace and keep a before-and-after comparison when settings change. Match networks to channel curves without treating overlap as proof of interference.
Before you start
- Enable Wi-Fi observation in Options and wait for a successful scan.
- Compare from the same location; moving your laptop changes which access points it can observe.
Show the networks you need
Get an overview of your surroundings in Visible Hotspots → Wi-Fi. Clear search and minimum-signal filters first; use them later to narrow both the list and diagram to the networks you want to compare.
Select a network and band
Find your network in the diagram by selecting its list row. Its curve highlights and the diagram switches to its band. Choose other bands to explore them; networks with unknown channel or signal are counted separately rather than plotted at guessed positions.
Match curves to list rows
Follow a curve back to its details using the colored network names below the diagram. Select a legend button to reveal the matching row. Hover for full names when labels are crowded; legend ordering follows your list’s rating or signal order.
Check the reported radio details
Check the reported facts before changing router settings. Expand Technical details and services for frequency, derived band and center channel, PHY, authentication and encryption where available. Missing fields remain unknown, and center channel alone does not establish channel width.
Keep a comparison
Export the prepared view to keep the selected band’s diagram, legend and filtered rows in a workbook. Repeat from the same location after a router change. Use Statistics and My networks to assess observed stability and connection sessions alongside the channel picture.
Confirm the result
- You can match the selected network's list row, highlighted curve and legend entry in the selected band.
- Your saved report includes the selected band's channel diagram and the filters used for the comparison.
Keep in mind
- Curve widths are illustrative. The app does not measure actual channel width, airtime usage or interference; overlapping curves alone do not establish congestion.
- A quieter-looking channel does not establish a more stable connection. Compare recorded presence and your connection experience as well.
See this screen in the app
WalkthroughsLet the app help you stay connected to better-rated Wi-Fi
Reduce manual Wi-Fi selection by choosing when the app reconnects or considers a better-rated available network. Keep control over switching and use the transfer safeguard to defer it while traffic is active.
Before you start
- Enable Wi-Fi scanning and keep the app running; its window can be hidden.
- Use Windows to save credentials for secured networks you want the app to join. A candidate must be visible and connectable on the relevant adapter.
- Build history where you use Wi-Fi so automatic choices have useful stability evidence.
Choose how to reconnect
To reduce manual reconnecting, review Try to keep Wi-Fi always connected in Options. It is on by default. With Wi-Fi scanning enabled, the app tries the highest-rated visible network your system can join when disconnected, excluding ignored networks and using secured networks with matching saved profiles on the same adapter. Allow open Wi-Fi networks for automatic connection is off by default; enable it to include open networks in automatic reconnection and switching, even when an open profile was already saved. Manual tray and shortcut selection remain available.
Require known internet access
Enable Only connect to networks known to have internet to restrict automatic reconnects and switches to networks and access points where the app has observed internet access. It starts off. Unknown access points are skipped; connect manually once and let the app observe access to make one eligible. Previous access does not guarantee internet is available now.
Choose when to switch
Decide whether the app should consider a better candidate while you are connected. Automatically switch to a better-rated hotspot when one is available is on by default. A candidate must be eligible and strictly higher rated; equal or lower scores keep your connection. Automatic attempts are at least one minute apart.
Protect current traffic
Defer automatic switching during traffic by keeping Only when there are no active transfers enabled. The app waits for two seconds without received or sent traffic on the connected Wi-Fi adapter, including local TCP and UDP traffic. Unknown measurements defer switching; manual tray and shortcut commands remain immediate.
Set the rating priorities
Match choices to your priorities in Options → Wi-Fi rating priorities. Presence first gives 50% to presence and 30% to throughput, Balanced gives 40% each, and Throughput first gives 30% and 50%. Supporting factors share 20%. Recommendations explains the points; missing or insufficient throughput evidence receives neutral points.
Request a choice now
When you want a choice now, use the tray’s Re-choose Wi-Fi intelligently or your configured shortcut. It scans for a strictly higher-rated visible network your system can join. Read Activity Log for the outcome and any attempt to restore the previous connection after a failed switch.
Return control to Windows when needed
To return automatic choices to your system, turn off both automatic options, turn off Wi-Fi scanning or quit. The app restores the saved networks’ original automatic-connection preferences while keeping credentials. If an adapter is unavailable, restoration is retained for a later attempt.
Confirm the result
- The reconnect, switching, transfer-protection and rating-priority settings match how you want to use Wi-Fi.
- Activity Log explains a connection attempt's outcome, or why automatic selection could not proceed.
Keep in mind
- Switching can briefly interrupt a call or other connection. Transfer protection checks recent adapter traffic and cannot guarantee an uninterrupted session.
- The app does not enable a disabled radio, enter passwords or make an absent saved network available. A higher score does not guarantee internet access.
See this screen in the app
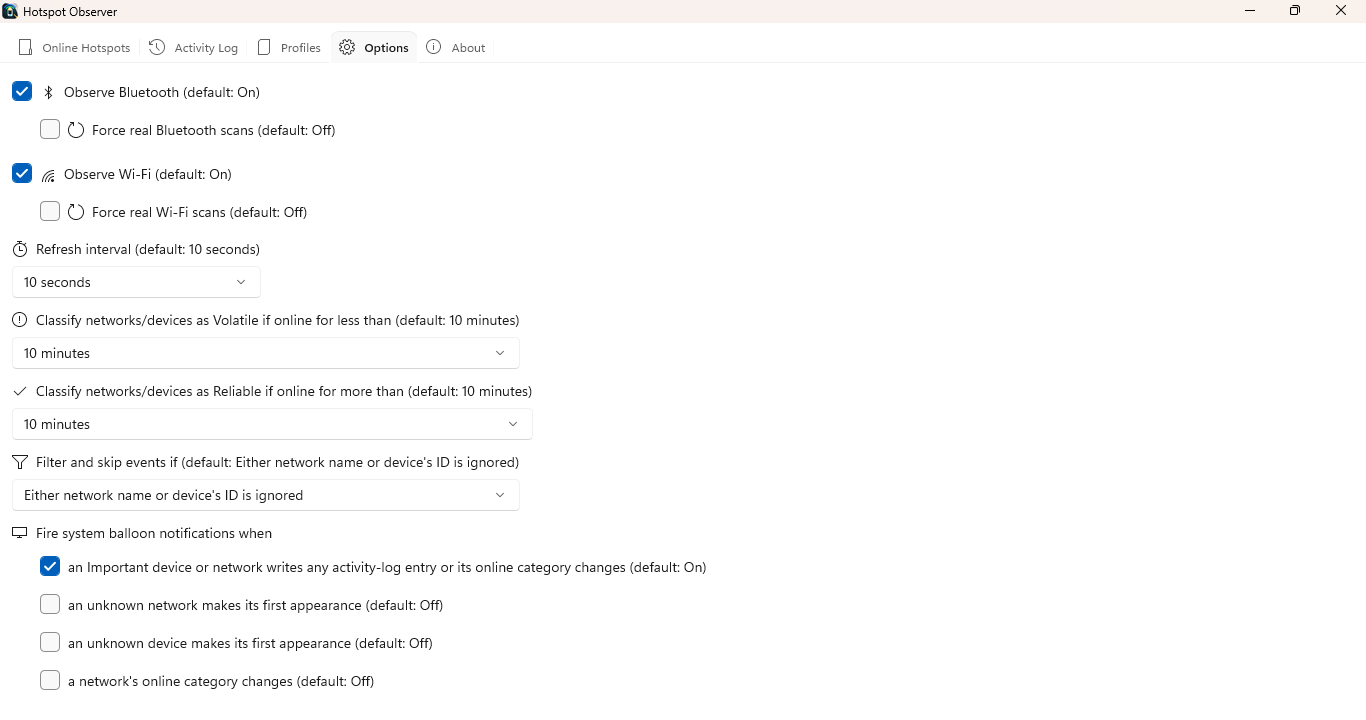
WalkthroughsCheck whether a network stays visible through your day
Look beyond the current nearby list to see repeated presence, gaps and time patterns. Compare the same period for each candidate and judge whether the recorded monitoring covers the hours you care about.
Before you start
- Select one radio type and one date range, then keep both unchanged while comparing items.
- Use a period with enough recorded monitoring; blank or interrupted monitoring is unknown evidence.
- For Wi-Fi comparison cards, choose no more than five networks with observations in the selected period.
Set one comparison context
Choose a period that matches your question in Statistics, or open it from an item’s Statistics action to select that item immediately. Choose Wi-Fi or Bluetooth and recent or custom local dates. Leave the item unselected for an overview. Refreshing... covers only chart regions being prepared, leaving filters, navigation and independent comparison cards usable.
Use Overview first
Check how much of your chosen period was actually monitored in Overview. The coverage ring separates recorded time in blue from unknown time in gray with exact percentages. Average and peak counts, median complete duration and disappearances summarize observations; count-chart shading stops between monitoring windows.
Read Presence
Find breaks in visibility in Presence. Compare the timeline, presence percentage, longest observed intervals and disappearances per monitoring hour. Duration columns share a scale; the median and 90th percentile exclude interrupted or date-clipped intervals. Use these as history rather than a forecast.
Compare Wi-Fi candidates
Make differences easier to judge by adding up to five Wi-Fi networks to comparison. Match the colored dots and cards on the shared 0–100% presence chart, then read coverage, disappearances, longest interval and signal range with bars. Unknown evidence remains labeled explicitly.
Open Time patterns
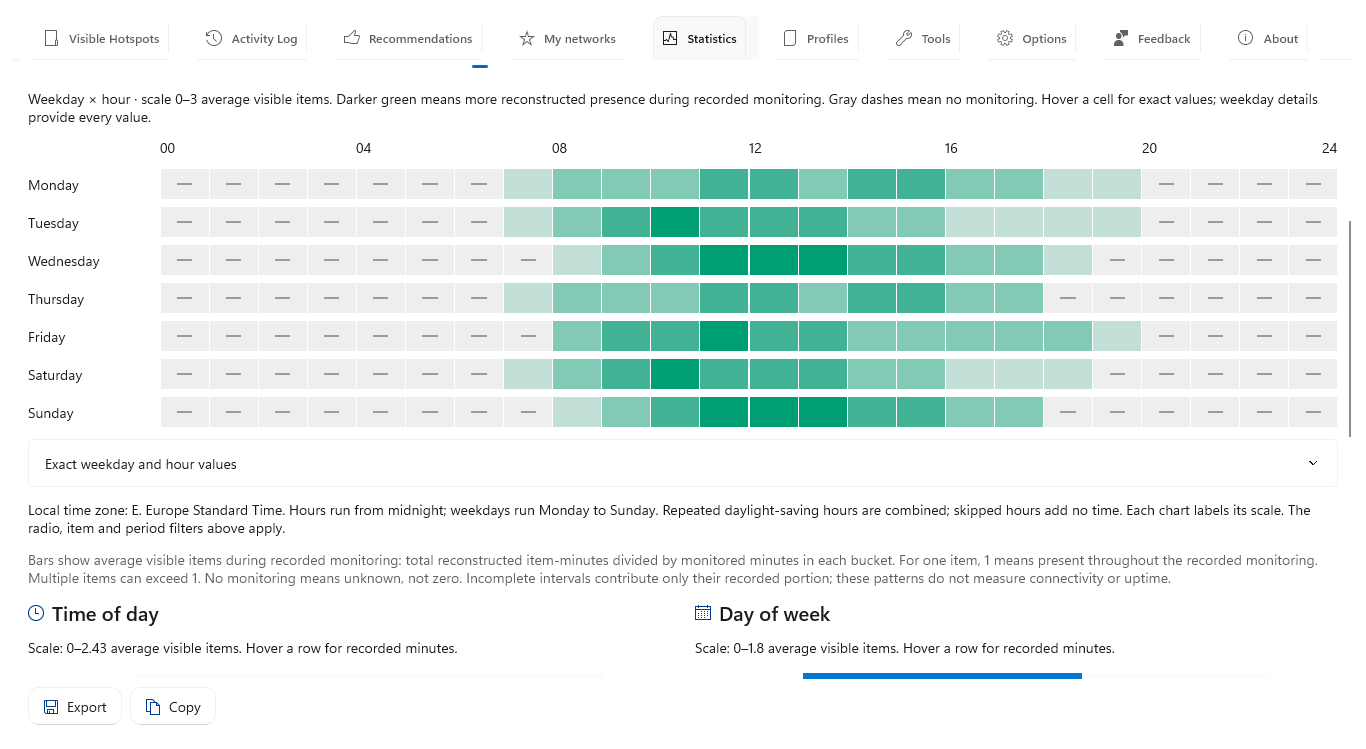
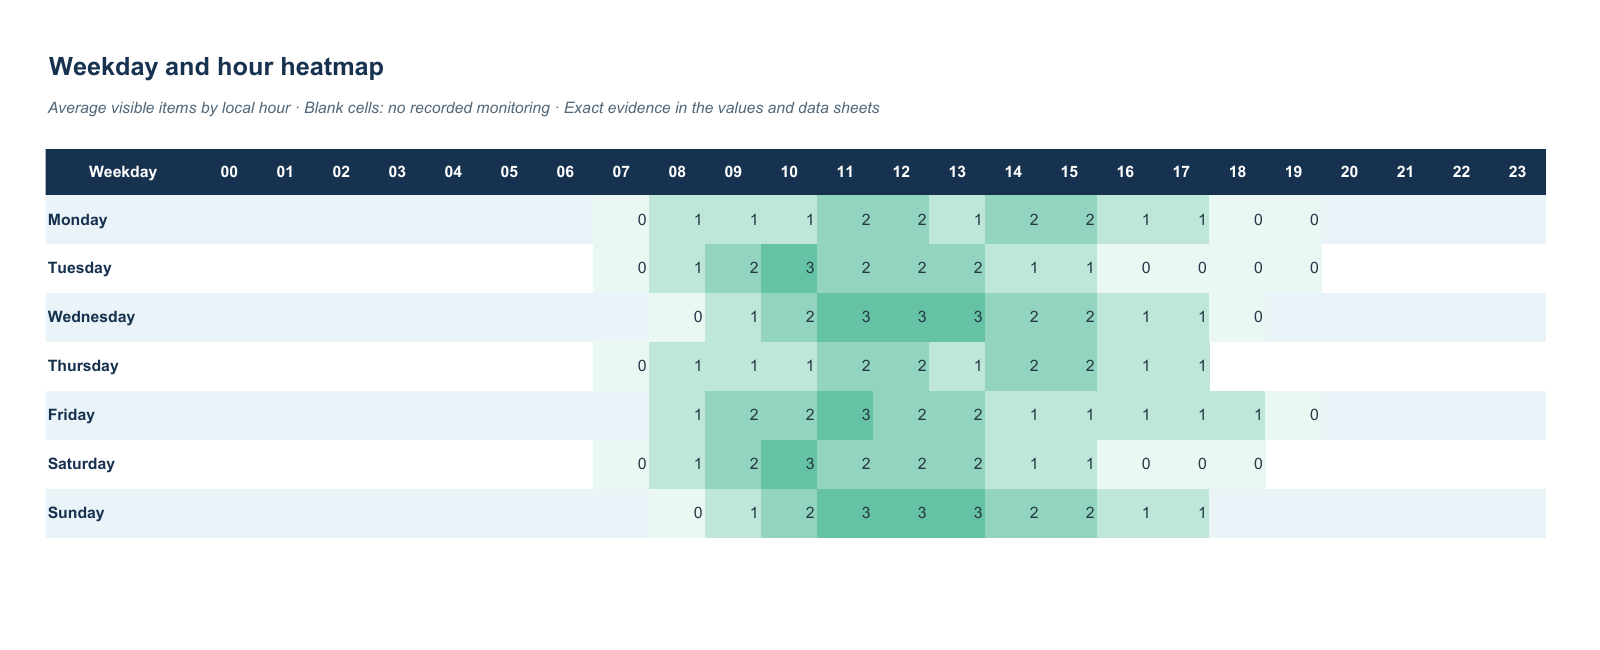
Check whether a pattern fits your routine in Time patterns. The 168 weekday/hour slots use local time: darker green means more average visible items during monitoring and gray dashes mean none was recorded. Hover or expand Exact weekday and hour values for averages and minutes; hourly and weekday bars give broader summaries.
Check Signal and Details
Follow a suspected change into Signal or Details. Signal dots are retained readings, while Details provides service lists and recorded events. Select an item to compare its observed before-and-after values without assuming continuous measurement between points.
Confirm the result
- Every item is compared over the same period and monitoring context.
- You can separate observed presence from monitoring coverage and identify incomplete or clipped intervals.
- You know which patterns are supported by repeated evidence and which remain uncertain.
Keep in mind
- Presence is reconstructed from retained events; it is not connection uptime.
- Signal plots use logged readings only, and bar-only tracking omits smaller dBm movements even though displayed readings include bars.
See this screen in the app
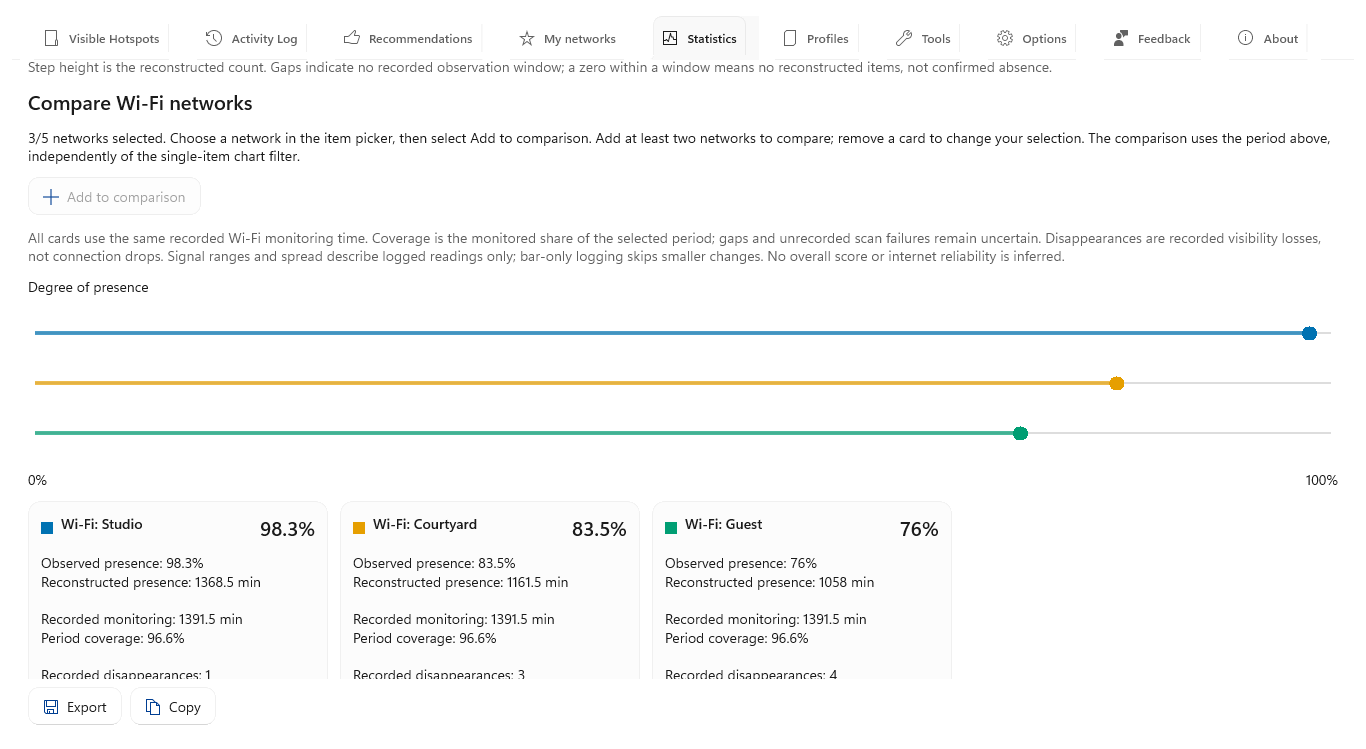
WalkthroughsFind the Wi-Fi worth trying first
Narrow your Wi-Fi choices by comparing up to five networks on one chart. See which stayed visible during your recorded monitoring and how much evidence supports your shortlist.
Before you start
- Record the candidate networks from the place where you intend to use Wi-Fi.
- Keep persistent Activity Log history for the period you want to compare.
Choose one period
Make your comparison fair: open Statistics, choose Wi-Fi and use one recent period or set of custom local dates for every candidate. The Overview coverage ring separates recorded monitoring from unknown time, so you can see how much of your day the comparison covers.
Build the comparison
Keep your shortlist together while you explore. Select a network and choose Add to comparison, then repeat for two to five networks. Choosing the next item does not replace existing cards; the comparison keeps the period above independently of the single-item chart filter.
Match colors and values
See differences at a glance by matching each colored dot to its card on the shared 0–100% presence chart. Read the exact percentage or Unknown label as well as the graphic, so color alone never decides your choice.
Check what supports the percentage
Check whether a promising result covers the hours you need. Read each card’s monitoring coverage, disappearances, longest observed interval and signal range with bars. A high percentage based on a short observation may tell you little about a full working day.
Inspect a candidate's gaps
Investigate a candidate before relying on it. Select it in the item picker and open Presence to inspect the timeline and interval durations. Monitoring gaps stay unknown; interrupted and date-clipped intervals are excluded from complete-duration summaries.
Refine and keep the shortlist
Keep the evidence for your next visit: export the prepared comparison to a workbook. Remove cards to try other candidates, review calculated ratings in Recommendations, and check your actual connection sessions in My networks before choosing.
Confirm the result
- Two to five networks appear together on the shared 0–100% presence chart.
- Your comparison uses one period and accounts for monitoring coverage, disappearances and longest observed intervals.
Keep in mind
- Observed presence is nearby visibility during recorded monitoring, not connection uptime or guaranteed internet access.
- Unknown evidence is not zero presence. A brief record is a weaker basis for choosing than repeated observations during your normal working hours.
See this screen in the app
WalkthroughsFind Wi-Fi patterns around the hours you need
Check whether nearby networks tend to be visible when you work or visit. Use the weekly heatmap to spot recurring patterns, then check the monitoring behind each result.
Before you start
- Run the app during the days and hours you want to investigate; it cannot reconstruct unobserved time.
- Set retention long enough to include the weeks you intend to compare.
Set the scope
Focus on the times that matter to you. In Statistics, choose Wi-Fi or Bluetooth and a period covering those days. Keep the overview selection for nearby-item patterns, or select one network or device to follow its own presence.
Open Time patterns
Look for recurring hours in Time patterns. The heatmap covers seven days and 24 local hours: darker green means more average visible items during monitoring, while gray dashes mean no monitoring. A darker slot is not a Wi-Fi quality rating.
Check the exact evidence
Check how much evidence supports a pattern before planning around it. Hover a cell or expand Exact weekday and hour values to read its average and recorded minutes; similar colors can be based on very different amounts of monitoring.
Compare the summaries
Use the hourly and weekday bars to find broad patterns quickly. Then return to the heatmap to see whether a high weekday average comes from a few hours or a pattern that lasts through your day.
Check a suspected disappearance
If a network seems to vanish at a regular time, select it and inspect Presence over those dates. Activity Log gives you individual appearance and disappearance events. A blank monitoring interval cannot tell you whether it was absent.
Save the weekly view
Save a pattern you want to revisit by exporting with Time patterns selected. Your workbook keeps the weekly visual and exact values for all 168 slots alongside their recorded monitoring time.
Confirm the result
- You can identify a recurring weekday/hour pattern and read its exact average and recorded minutes.
- You can distinguish a measured low value from a gray slot with no monitoring.
Keep in mind
- Darker green means more average visible items, not better Wi-Fi, faster traffic or a safer environment.
- Weekly slots combine observations within the selected period in the laptop's local time. Uneven monitoring and a small number of observed days can distort an apparent routine.
See this screen in the app
WalkthroughsDecide whether you would use this Wi-Fi again
Review the connection sessions you actually used, including reported internet interruptions. Keep your own rating and notes alongside measured evidence so your next choice reflects your experience.
Before you start
- Leave Hotspot Observer running during normal network use so it can observe complete sessions.
- Use the same saved Windows Wi-Fi profile repeatedly; profiles on different adapters are separate.
- For a measured verdict, collect at least three sessions lasting one minute and 30 observed minutes in total.
Review completed traffic
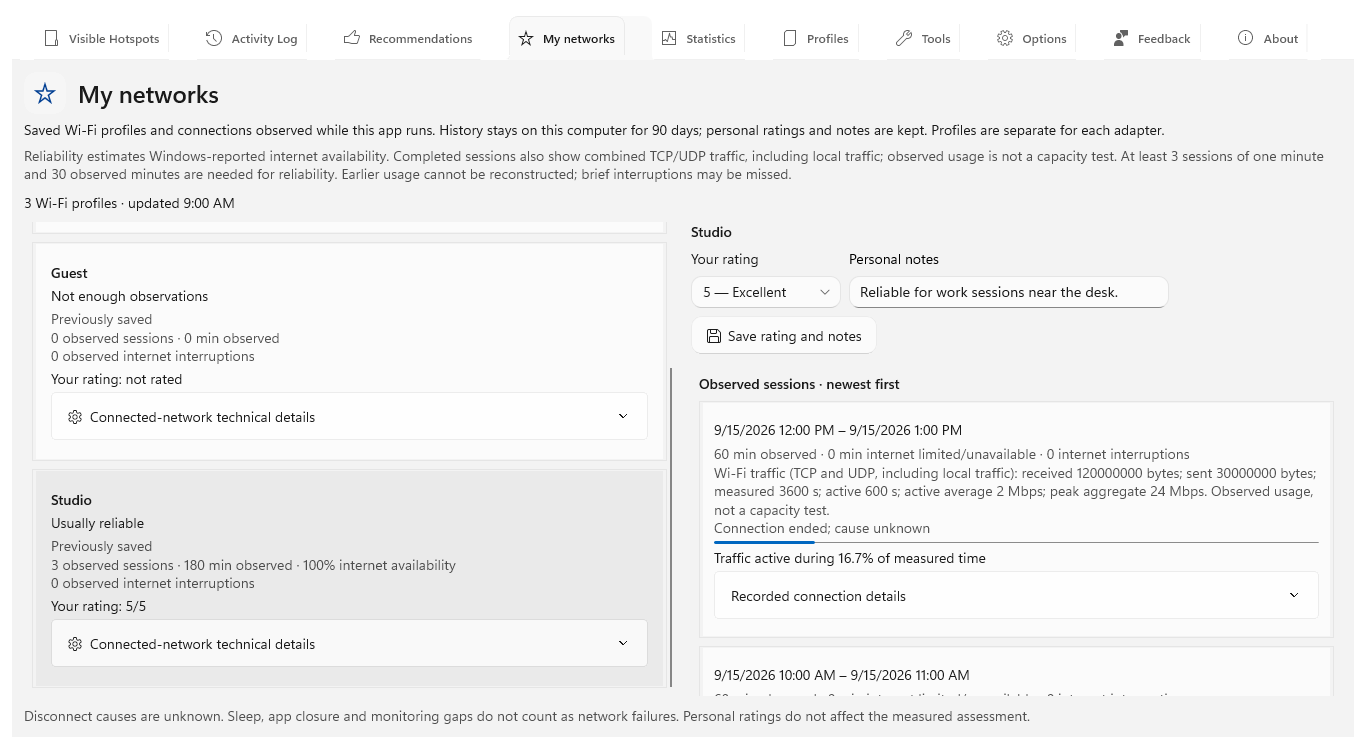
Learn from normal Wi-Fi use while the app runs. Completed sessions show received and sent bytes, measured and active time, active average Mbps, peak combined Mbps and an active-time bar; Activity Log keeps one summary. Measurement needs no administrator access and covers TCP, UDP and local traffic on that adapter. Other adapters, missing counters, resets and sleep gaps do not supply measurements.
Open My networks
Find the connection you want to assess in My networks. Select its saved Wi-Fi profile to review observed session durations, estimated time with limited or unavailable internet and the measured reliability assessment.
Inspect technical snapshots
Keep technical context for a problem you may need to explain later. Expand Connected-network technical details or Recorded connection details for captured adapter, radio, security, address and DNS settings. The timestamp tells you when they were observed; unknown fields and offline settings are not guessed.
Add your experience
Save what mattered to you: choose a personal rating from 1 to 5, add notes and save. Your review stays separate from the calculated recommendation score, so you can record whether calls, browsing or other work met your needs.
Wait for enough evidence
Build enough experience before relying on a reliability verdict: at least three sessions lasting one minute and 30 observed minutes in total. Keep the app running during those sessions. Earlier usage cannot be reconstructed, and profiles on different adapters stay separate.
Interpret it carefully
Use the verdict alongside your own experience. It uses reported internet availability rather than a speed or latency test; brief interruptions may be missed and a disconnect’s cause remains unknown. Sleep, app closure and monitoring gaps do not count as network failures.
Confirm the result
- You can distinguish the measured reliability assessment from your own 1–5 rating and notes.
- The session list shows when each observed connection began, how long it lasted, and any Windows-reported interruption time.
Keep in mind
- The app cannot reconstruct sessions from before it was running.
- Windows-reported availability is not a speed or latency test. Passive traffic depends on demand and includes local traffic; the active average excludes idle samples. Short interruptions or traffic between association checks may be missed. A missing access-point identity prevents a traffic rating adjustment.
See this screen in the app
WalkthroughsLearn how Wi-Fi handled your everyday use
Review the traffic your completed Wi-Fi sessions actually carried without generating a separate test transfer. Keep your own experience alongside those measurements when deciding whether to use the network again.
Before you start
- Keep Hotspot Observer running while you use Wi-Fi normally.
- Allow a session to finish naturally; changing access point also ends its recorded session. You do not need to interrupt a connection just to collect a summary.
Use the connection normally
Collect evidence while doing your usual work: browse, work or transfer files with the app running. Let the session end naturally when you disconnect or change access point. Adapter-counter measurement needs no administrator access and generates no dedicated speed-test transfer.
Open the completed session
Find the session you want to judge in My networks: select its saved Wi-Fi profile and open a completed session. Profiles on different adapters stay separate. You can also find one traffic summary per completed session in Activity Log.
Read bytes and time together
See how much data moved and how much of the measured time included traffic. Review received bytes, sent bytes, measured time and the active-time bar together. Active time means a sample contained traffic, not that you were interacting with the computer.
Interpret the throughput
Put the observed Mbps in context. Active average combines received and sent bytes over active time; peak combined Mbps shows the highest measured rate. Idle samples are excluded, so a low browsing average may reflect light demand rather than a slow connection.
Follow its effect on ratings
Choose how much your actual usage should influence future choices in Options → Wi-Fi rating priorities. Recommendations uses recent completed sessions on the same access point after at least 30 active seconds and one MB. Missing or insufficient measurements receive neutral points.
Add your own experience
Record what the measurements cannot tell you: add a personal 1–5 rating and notes in My networks. These stay separate from calculated scores. Use Tools → Speedtest when you need an active performance check and can allow its substantial traffic.
Confirm the result
- A completed session shows its traffic measurements or an explicit unavailable result.
- You can explain the difference between total measured time, time with traffic, observed throughput and an internet capacity test.
Keep in mind
- Counters cover TCP and UDP on the connected Wi-Fi adapter, including local traffic. They do not identify which application produced the traffic or measure spare internet capacity.
- Missing counters, resets and monitoring gaps leave unavailable evidence. Short traffic bursts between association checks may be missed; other adapters are excluded.
See this screen in the app
WalkthroughsFind clues when your connection feels slow
Check whether your current connection is transferring slowly, responding late or struggling with name lookups. Choose a targeted tool and keep its summary to compare results or explain a problem.
Before you start
- Connect your Windows laptop to the network you want to check and pause other large transfers.
- For Speedtest, allow for substantial traffic, often several hundred MB or more. A metered or limited connection may not be suitable.
- Keep the same Wi-Fi connection for the whole run if you want the Activity Log entry linked to that network.
Open Tools
Start with the symptom you want to understand. Connect to the network, open Tools and choose Speedtest, Latency, DNS lookup, Connection details or Route trace. You control when a check starts, and only one tool runs at a time.
Measure HTTP speed
Check active transfer performance with Speedtest. Half-duplex measures receiving and sending in sequence; full-duplex measures both at once. Follow the live Mbps charts, HTTP ping and jitter. HTTP ping includes the HTTPS server response and differs from ICMP ping. Allow for substantial traffic, often several hundred MB or more.
Watch latency and packet loss
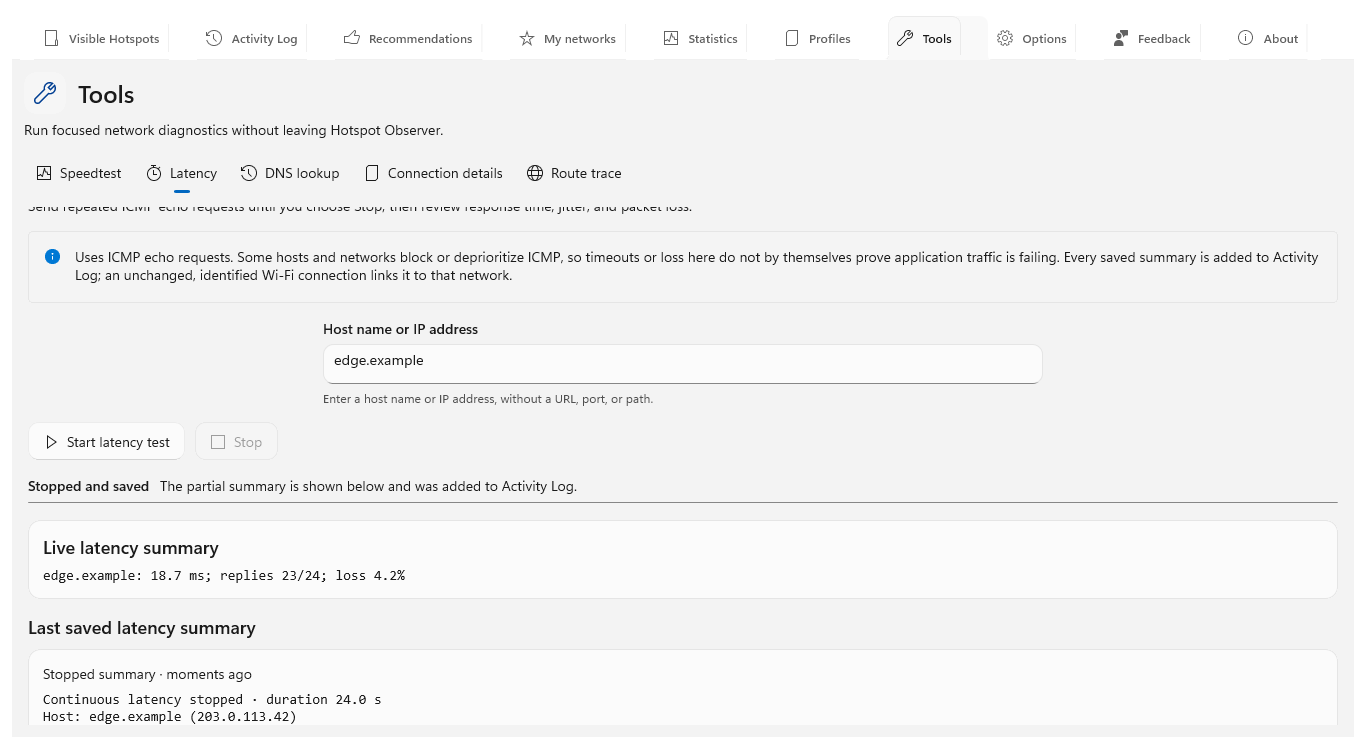
For delayed or interrupted responses, enter a host name or IP address in Latency and start the continuous check. It sends ICMP echo requests until Stop, summarizing replies, timeouts, response time, jitter and packet loss. Blocked or deprioritized probes can affect results independently of your applications.
Investigate DNS
If names fail to open, choose DNS lookup and an Investigation, enter a DNS name or IP address without a URL, port or path, then select Look up host. Windows address lookup uses normal IPv4/IPv6 resolution and caching. Advanced checks retain the answering resolver, response code, TTLs and answer, authority and additional records with exact timing bars.
Query records and reverse names
Find the particular DNS evidence you need with DNS record query, a record type or Custom TYPE number. SRV and TLSA need the full service name. Reverse DNS queries PTR names for an IP or up to 16 addresses resolved from a name; a PTR record alone cannot establish ownership.
Compare resolvers and response times
See whether resolvers differ by supplying up to eight comma-separated IPv4/IPv6 addresses without ports. Most checks use the first supplied resolver or configured DNS when blank. Compare resolvers checks configured DNS plus each supplied address; when blank it also uses DNS resolver addresses 1.1.1.1, 8.8.8.8 and 9.9.9.9. Repeated measurements sends 2–20 requests and compares answers ignoring TTL changes. The app cache is bypassed, but upstream caches remain. TCP only tests TCP; otherwise truncated UDP replies fall back to TCP.
Trace delegation and inspect DNSSEC
Investigate where DNS delegation stops with Trace delegation, which follows nonrecursive referrals from root servers toward an authoritative server with a 16-hop limit and explicit incomplete results. DNSSEC evidence requests signed records and reports AD, the resolver’s authentication claim, without independently validating signatures. Use the zone apex for zone-key checks; missing host-name keys do not prove an unsigned parent zone.
Inspect email DNS
For mail-name problems, enter the exact mail domain to inspect MX, SPF, DMARC, MTA-STS and TLS reporting. Supply the sender’s DKIM selector for its key. These are DNS checks, not delivery, policy inheritance, SPF evaluation, DKIM signature or HTTPS policy tests. Stop keeps completed advanced-query evidence in Activity Log.
Read connection details
Check which connection your computer is using in Connection details. Review the preferred connection, interface type, local addresses, gateways, DNS servers and available reported link speed. Link speed describes the connection’s configuration, not measured internet throughput.
Read the technical snapshot
Keep configuration clues when reporting a problem: Connection details includes available security, adapter ID and MAC, IP prefixes and origins, MTUs, DHCP and DNS settings, IP support and cumulative counters. Wi-Fi details can include BSSID, channel, PHY, RSSI with bars, quality, negotiated rates and 802.1X state. My networks retains the latest timestamped connection and session snapshots; unavailable fields remain unknown.
Trace the route
Explore the path to a destination with Route trace. Enter the destination and follow measured hops; Stop keeps a partial summary after the first measured hop. An unanswered router may simply decline ICMP probes and does not by itself identify a broken connection.
Review the saved summary
Return to a result without rerunning its test: each tool keeps its previous summary when you switch tools. Every produced result also goes into Activity Log, linked to the Wi-Fi network when the same identified network stayed connected. Stopping continuous latency or route trace after a measurement preserves the partial summary.
Compare like with like
Compare results from the same place, connection and similar times to reduce misleading differences. Use these momentary checks alongside Recommendations and Statistics for evidence of observed Wi-Fi stability over time.
Confirm the result
- The selected tool shows a readable summary and keeps the previous saved summary if a new run cannot finish.
- Every produced summary appears in Activity Log, even without an identified Wi-Fi connection; an unchanged connection links the entry to that network.
- Stopping continuous latency or route trace after a measurement keeps and logs the partial summary.
Keep in mind
- A tool describes one path or Windows configuration at that moment. It does not prove Wi-Fi stability, security, or future performance.
- Latency and route trace use ICMP. Hosts and routers can block or deprioritize those probes, so loss or an unanswered hop does not by itself prove normal application traffic is failing.
See this screen in the app
WalkthroughsFind clues when a website name will not resolve
Narrow down a name-resolution problem by comparing DNS answers and response times. Keep the results so you can explain what failed or compare a later check without changing your DNS settings.
Before you start
- Write down the exact DNS name that fails. Enter a name or IP address without a URL scheme, port or path.
- Use Connection details to inspect the current interface and configured DNS servers. Tools also work on a wired connection without Wi-Fi.
- Keep the connection unchanged while comparing results, and use only resolver addresses you intend to contact.
Start with Windows resolution
See the name-resolution result your Windows applications normally use. Open Tools → DNS lookup, choose Windows address lookup in Investigation, enter the affected name and select Look up host. This keeps normal Windows IPv4/IPv6 resolution and cache behavior as your baseline.
Ask for the record you need
Check the record relevant to your problem with DNS record query: A or AAAA for addresses, for example. Results show the answering resolver, response code, TTLs, answers, authority and additional records. An answer with no requested records is different from a timeout or name error.
Compare resolver answers
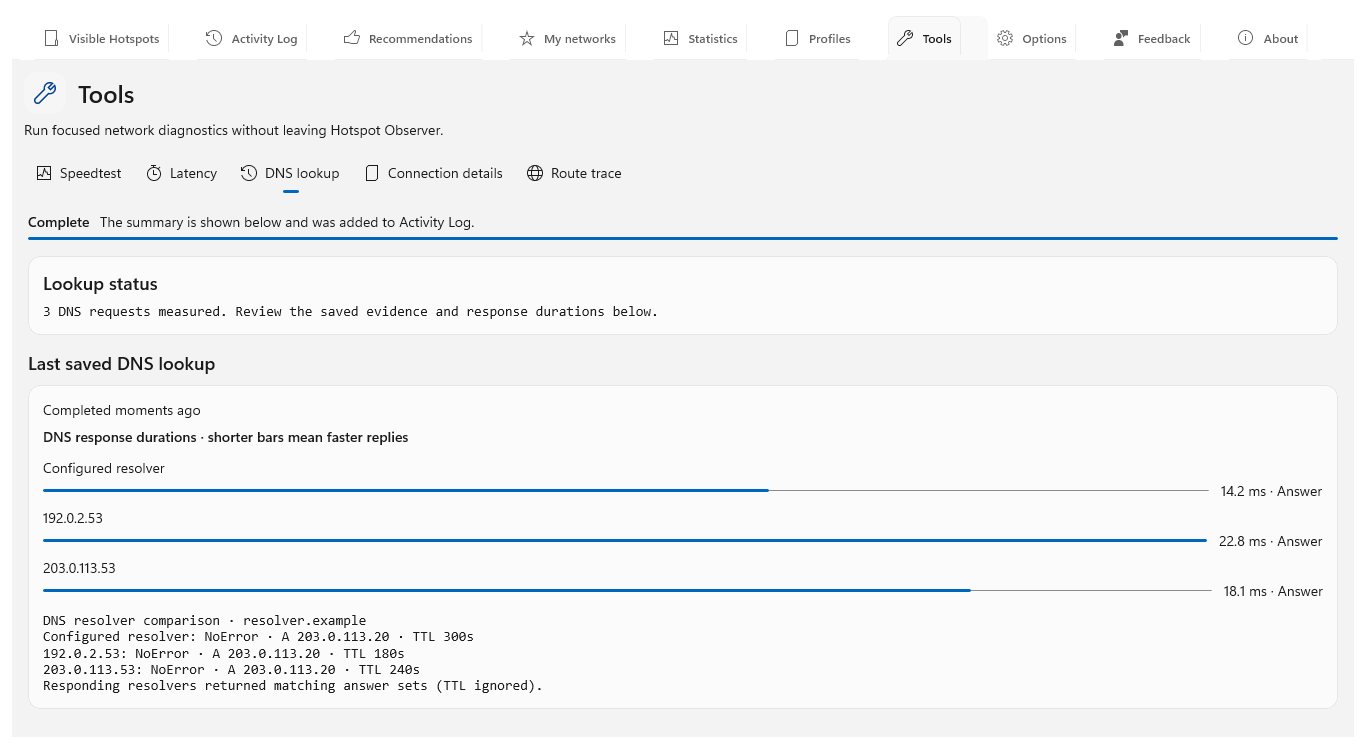
Find out whether resolvers disagree using Compare resolvers. Enter up to eight comma-separated IPv4/IPv6 resolver addresses without ports to compare with configured DNS. Leave it blank to also check DNS resolver addresses 1.1.1.1, 8.8.8.8 and 9.9.9.9. Read each response and timing; network policy may block a public resolver.
Check whether the result repeats
Check whether a slow or changing answer repeats: choose Repeated measurements and request 2–20 checks. Review minimum, average and maximum timings and answer changes. TTL changes are ignored; the app cache is bypassed, but upstream caches remain.
Check transport or delegation
For a deeper investigation, use TCP only to compare TCP responses, or Trace delegation to follow referrals from root to an authoritative server. Truncated UDP replies otherwise fall back to TCP. Delegation has a 16-hop limit and marks incomplete results; use the zone apex for DNSSEC zone-key evidence.
Keep and interpret the result
Keep findings in Activity Log, then Copy or Export them before retention removes older history. Stop retains completed advanced-query evidence. If DNS answers look useful but the site still fails, try Latency or Route trace and the site itself in your browser; a DNS answer alone cannot confirm working application traffic.
Confirm the result
- You have the response code, answers, responding resolver and timing for the name and record type you checked.
- The produced summary is saved in Activity Log, including when no Wi-Fi network can be identified.
Keep in mind
- Different answers can be legitimate, including location-dependent services and cached records. A timeout alone does not establish why a website failed.
- These checks do not change Windows DNS settings. DNSSEC evidence reports the resolver's authentication claim rather than independently validating signatures.
See this screen in the app
WalkthroughsUnderstand a change you noticed nearby
Find the recorded moment a Wi-Fi network or Bluetooth device appeared, disappeared or changed. Add context and keep the relevant events so you can compare what happened later.
Before you start
- Choose whether you are investigating a Wi-Fi network or a Bluetooth device; use those terms when filtering.
- Confirm Activity Log persistence and the required signal or service tracking options were enabled during the period you need.
- Write down the approximate time of the behavior you want to inspect.
Start with the current list
Locate the item you noticed in Visible Hotspots. Search or narrow the minimum-signal filter when the list is busy. Wi-Fi supports recommendation or signal ordering; Bluetooth devices appear in signal ordering.
Compare Wi-Fi channels
For Wi-Fi, use the channel diagram to understand the surrounding radio layout. Choose a band and select a diagram entry to reveal its row; both panes follow your filters. Curve widths are illustrative, and actual channel width and airtime usage remain unknown.
Open the related events
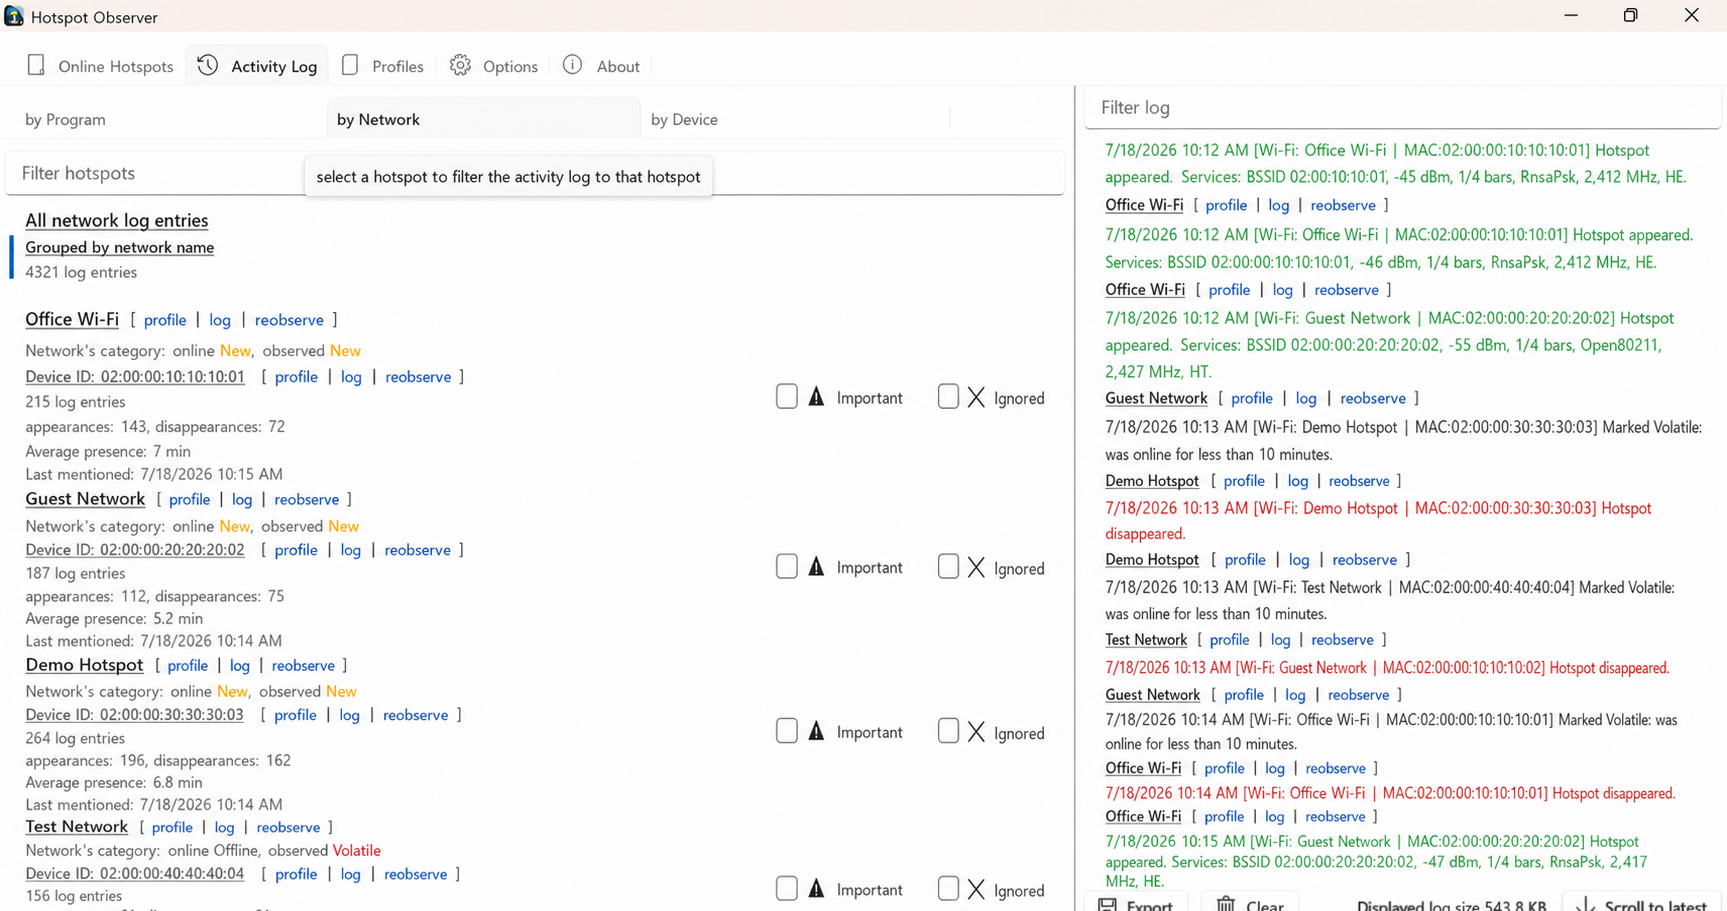
Go straight to the item’s recorded history with Log. Or open Activity Log, search its text, choose network or device grouping and select the item. Your selection stays in view after updates; tall rows can be scrolled within. Refreshing... hides the log pane until its latest rows are ready while preserving a selection you make during the update.
Read application and place events
Choose Program in Activity Log to see application events without network or device attribution. Use its search to narrow those entries without loading the network and device rows. Choose by Place to group recorded events by place, including unassigned observations. Select All locations in History and analysis to compare places; existing searches and filters still apply.
Reach the latest entry
Use Scroll to latest to reach the newest matching entry after refresh. If you leave the tab, a pending scroll resumes when you return. New events follow the end when you are already there; reading older entries preserves your position.
Read event details
Match the time you noticed to appearance, disappearance, signal-rating or service-list events. Signal and service changes require their Options tracking settings. Failed scans leave earlier observations uncertain rather than proving that an item disappeared.
Make the item recognizable
Make the next investigation quicker by selecting its row in Profiles → Networks or Devices and editing the note in its details pane. Changes save automatically. Use its Statistics action when you want to compare patterns across the retained history instead of reading individual events.
Confirm the result
- The Activity Log is filtered to one network or device and the relevant time range.
- You can identify the appearance, disappearance, signal-bar change, or service-list change that explains what you saw.
- A saved note makes the item easier to recognize later.
Keep in mind
- A failed scan leaves prior state stale; it does not prove that an item disappeared.
- A missing event may mean the relevant tracking option was off or the event fell outside retained history.
See this screen in the app
WalkthroughsKeep useful history without an overwhelming list
Choose the networks, devices and changes worth recording for your questions. Keep enough history for meaningful comparisons and hide distractions while retaining control over what you remove.
Before you start
- Decide whether you need Wi-Fi networks, Bluetooth devices, or both.
- Choose the longest comparison period you expect to use; retention must cover that period.
- Consider storage and noise: detailed signal logging records more events than bar-rating-only logging.
Choose the radios
Record the sources you need by enabling Wi-Fi, Bluetooth or both in Options. Bluetooth visibility depends on advertising, power, radio conditions, your adapter and system support; the app does not connect to a device just to observe it.
Limit Wi-Fi observation
If you only want likely connection candidates, enable Observe only saved and open Wi-Fi networks. It is off by default. The filter skips new observations of other secured networks, preserves existing history and leaves Bluetooth unchanged. Saved credentials or an open network still do not guarantee internet access.
Choose event detail
Choose the detail that will help your investigation: signal-change and service-list tracking are independent. Log only bar rating changes reduces small signal-event noise while retaining changes between the displayed bar levels.
Keep enough history
Keep the period you expect to compare by enabling persistent Activity Log history and choosing retention from 24 hours to 12 weeks; the default is one week. My networks keeps connection sessions separately for 90 days. Shortening retention may remove evidence you still need.
Hide irrelevant items
Reduce distracting results with Ignore on a visible item, log item or profile. Ignored items are excluded from recommendations and statistics. Review or restore them in Options and choose how ignored names and device IDs suppress events. Use notes instead when you want an item recognizable but still included.
Confirm the result
- The enabled radios, event detail, persistence, and retention period match your purpose.
- Ignored networks and devices are excluded intentionally and can be restored from Options.
- A later scan and Activity Log refresh show the expected kinds of events.
Keep in mind
- Reducing retention can remove older observations needed for statistics.
- Ignoring an item excludes it from recommendations and statistics; use a note instead if you still need its history in normal results.
See this screen in the app
WalkthroughsKeep evidence you can review or share later
Save the comparison you prepared as a readable report with charts and supporting values. Revisit a Wi-Fi decision later or share the relevant evidence without rebuilding your filters.
Before you start
- Finish filtering and sorting the source view before exporting; only the current view is included.
- In Statistics, choose the radio, date range, item, and tab that should appear in the workbook.
- Choose a destination folder you can find again and close an older file with the same name if another app has it open.
Prepare the view
Choose the evidence you want to keep before saving: filter Visible Hotspots, Activity Log, its grouped side list or Profiles. In Statistics, choose the radio, period, item and tab. Export and Copy follow the current view.
Choose Export
Choose Export to keep the view’s text, colors, cards and charts in a workbook. Visible Wi-Fi includes the selected band’s channel plot and legend. Current view uses editable text boxes and shapes; edits do not recalculate statistics. Statistics also has native Editable charts linked to Chart data. Supporting sheets keep all filtered rows and exact evidence, including the 168 heatmap slots; monitoring gaps remain separate. Activity Log also offers CSV and text.
Analyze Item statistics
For your own comparisons, sort or filter the Item statistics sheet by presence, coverage, disappearances per monitoring hour, longest intervals or median and 90th-percentile complete durations. It includes matching items beyond chart row limits. Percentages and fractional minutes stay numeric; blank metrics mean unavailable evidence.
Choose Copy for a quick table
Use Copy when you need a quick table for a spreadsheet, document or message. It places the displayed data on your clipboard and confirms the action without shifting the layout.
Return to the source
Choose Open after exporting to review the saved file and confirm its period, filters and rows. Remove identifiable names, addresses and notes before sharing. The report preserves observed evidence; it cannot establish speed or connection uptime from nearby visibility.
Confirm the result
- The saved file opens and its heading, filters, period, and rows match the source view.
- Excel opens with the prepared view's text, colors, cards and chart geometry as editable objects. Visible Wi-Fi reports include the selected band's channel plot and legend. Supporting sheets retain numeric metrics, readings and intervals.
- Copied tables paste into a spreadsheet or document with useful columns intact.
Keep in mind
- An export preserves recorded evidence but does not convert visibility into speed, reliability, or connection uptime.
- If a file cannot be replaced, choose a new name or close the program currently using it.
See this screen in the app
Everyday controlsRecognize useful items and keep your own experience
Save context you will remember next time, distinguish your review from measured ratings and hide distractions from everyday results.
Add context in Profiles
Make a network or device easier to recognize in Profiles: choose Networks or Devices and select a row. The details pane holds its note, Important and Ignored choices, technical details and actions; edits save automatically. The list stays lightweight, and filtering or switching tabs keeps retained rows and the selected editor. Search matches names, identifiers, services, notes and last-seen text on Windows and Linux. Its Statistics action takes you to retained history when you need evidence alongside that context. Open Profiles → Places to save names and notes, inspect fingerprints and mobile exclusions, browse a place’s history or archive and restore it. Place edits use Save place; Use as current place explicitly changes observation attribution.
Separate personal reviews
Keep your experience separate from calculated evidence. In My networks, add a personal 1–5 rating and notes for a saved Wi-Fi profile. Completed sessions also show combined TCP/UDP traffic and active time. To change how future calculated choices weigh evidence, use Options → Wi-Fi rating priorities: Presence first (50% presence / 30% throughput, the default), Balanced (40% / 40%) or Throughput first (30% / 50%), with 20% for other factors. The choice affects nearby scores, Recommendations and automatic Wi-Fi choices; insufficient recent traffic evidence from the same access point gets neutral points.
Hide distracting items
Reduce list noise with Ignore, then review or restore hidden items in Ignored items. Read deletion confirmations before acting: hiding an item and deleting its accumulated history have different results. Export evidence you want to keep before deleting it.
Keep in mind
- Make an export before deleting evidence you may need later. Restoring an ignored item does not recreate deleted history.
Everyday controlsKeep observations in the right location
Name familiar places, confirm a suspected move and keep comparisons tied to the right surroundings.
Before you start
- Use 5.13.0.0 beta or later for per-place fingerprint choices, statistical mobility estimates and the by Place tab.
Name the place where you observe
Keep new evidence with its surroundings: choose Name this place, enter a name such as Home or Office and add optional notes. Open Profiles → Places to create saved places, edit names and notes, inspect access-point fingerprints, or archive and restore places without erasing their history. Saving a place profile does not move observation there: choose Use as current place explicitly, including for wired checks without Wi-Fi. With automatic recognition off, your manual selection stays across restarts until you change it.
Resolve a suggested move
Open Location options to control recognition and unfamiliar-place prompts. Place recognition compares access-point identities (BSSIDs), not network names. A changed Wi-Fi fingerprint needs at least three complete scans spanning 30 seconds before recognition or a prompt. Profiles → Places shows the fingerprint: checked access points contribute to that place; unchecked ones do not. Statistical estimates can filter likely mobile or shared anchors, while your custom choices remain authoritative. Scans and history remain available. A clear match can recognize a saved place automatically. Otherwise name the place, choose a saved one or select Leave unassigned for now.
Keep visits and unknown time separate
Let a suspected move remain unassigned while recognition is pending, so new observations are not attributed to the previous place. Returning to a saved place starts a separate observation segment. Open Unassigned location to inspect uncertain observations and older records; naming a place today does not rewrite them.
Choose the evidence to inspect and keep
Use History and analysis to browse Current place, a saved place, Unassigned location or All locations. In Activity Log, choose by Place to group events by their recorded place, including Unassigned location. Select All locations above to compare places; search and other filters still apply. Profiles, Recommendations, My networks and Statistics follow that scope; live observation and automatic Wi-Fi selection still use your current place. Keep the location context with exports. My networks saves personal reviews per place; All locations keeps review editing read-only.
Confirm the result
- Current place assigns new observations; browsing history does not change it.
- Your comparison and exported evidence retain the selected location context.
Keep in mind
- Recognition suggests a place; it does not determine an address or geographic coordinates. Router or adapter changes can resemble a move, so confirm the place when uncertain.
- Old records stay unassigned. Failed scans and sleep leave unknown observation time, rather than evidence of an outage or a new place.
- Place names, notes and recognition fingerprints are saved locally. Back up preferences with history and connection records, and review identifying details before sharing exports.
Everyday controlsChoose the access points that identify a place
Keep passing networks out of a place's fingerprint, inspect automatic mobility estimates and retain control over the evidence used.
Before you start
- Open Profiles → Places and select a saved place. Access-point identities identify Wi-Fi surroundings, not a geographic address.
Read checked as included
Checked access points contribute to this place's fingerprint; unchecked ones do not. Other observed access points are listed so you can add them. An automatically learned fingerprint may filter likely mobile or shared anchors. A new place saved in Profiles starts with no selected access points; saving its name does not move observation there.
Save a custom fingerprint for this place
Check or uncheck access points to keep a custom fingerprint. The checked set applies only to this place and overrides automatic mobility estimates here. Choose several local access points when possible: a single access point may be carried elsewhere or cover more than one place. Use as current place confirms where new observations belong; it preserves your custom choices.
Interpret the statistical estimate
Learning uses complete windows of at least three scans spanning 30 seconds. Automatic classification needs at least four sustained sessions in each of two unrelated Wi-Fi contexts, three context changes, and a Wilson 95% presence-interval lower limit at least 50% in each supporting context. After removing the candidate, both contexts need at least two other access points and at most 20% overlap. Continuous observation counts as one session; restarting in the same surroundings within 30 minutes reuses it. The displayed limit summarizes session presence, not the probability that a device is mobile.
Return to automatic evidence when useful
Use automatic evidence to clear this place's custom choices and return to its learned fingerprint. If none was learned, confirm the current place and let complete scans establish one. Location options → Detect mobile/shared Wi-Fi access points controls automatic estimates throughout the app; your custom fingerprints remain authoritative. Neither changing a fingerprint nor excluding an access point removes its scans or history.
Confirm the result
- The checked set matches the access points you want to identify this place.
- A change to one place's choices does not change another place's fingerprint.
Keep in mind
- Likely mobile or shared is an estimate. Wide-coverage stationary access points can be poor place anchors too. Brief appearances, weak reception and a single router replacement do not establish mobility.
- Learning starts with new complete scans; older event logs are not treated as complete scan snapshots. Randomized access-point identities need fresh evidence.
- Established statistical exclusions retain their supporting history; later absence does not prove an access point became stationary. A custom fingerprint lets you override the estimate.
Everyday controlsNotice changes to the networks and devices you care about
Spend less time watching the list. Mark useful networks and devices Important, choose their alerts, and jump from a notification to the item and its logged evidence.
Before you start
- Enable observation for the relevant radio and any event tracking you need.
- Keep the app running, including with its window hidden, and allow Windows notifications when you want visible alerts.
Identify the right item
Make sure an alert will refer to the right item. Find it in Visible Hotspots or Profiles, check its available technical details and add a recognizable note. Bluetooth devices may advertise only while awake or in a particular mode.
Mark it Important
Mark the item Important so the relevant filters and notification rules can recognize your choice. The marker is your preference; it does not improve measured evidence or establish that a device is trusted.
Choose useful notification rules
Keep alerts relevant to you. In Options, enable the notification condition for important items’ logged events, then review unknown-item and category-change rules separately. Enable signal-change or service-list tracking if you need alerts about those recorded changes.
Check the event first
Understand what prompted an alert by choosing Log on the item or opening Activity Log. Alerts correspond to logged information. Missing events can mean tracking was off, monitoring was not running or the retained period has expired.
Open an alert
Activate a useful item notification to bring the app forward with that network or device selected and scrolled into view. Activated, expired and superseded notifications are dismissed, so you can act on relevant alerts.
Resolve missing alerts
If you missed an alert, check the Important marker, notification rule and your Windows notification settings. Activity Log still lets you inspect or export an event when Windows has muted its notification.
Confirm the result
- The intended network or device is marked Important and the relevant notification option is enabled.
- An alert corresponds to a recorded event, and activating a useful item alert brings the app forward with that item selected and revealed.
Keep in mind
- An alert reflects what the app observed and logged. It does not establish who owns a device, where it is located or whether a network is trustworthy.
- Windows notification settings, Focus or Do not disturb can suppress visible alerts. Expired and superseded notifications are dismissed automatically.
See this screen in the app
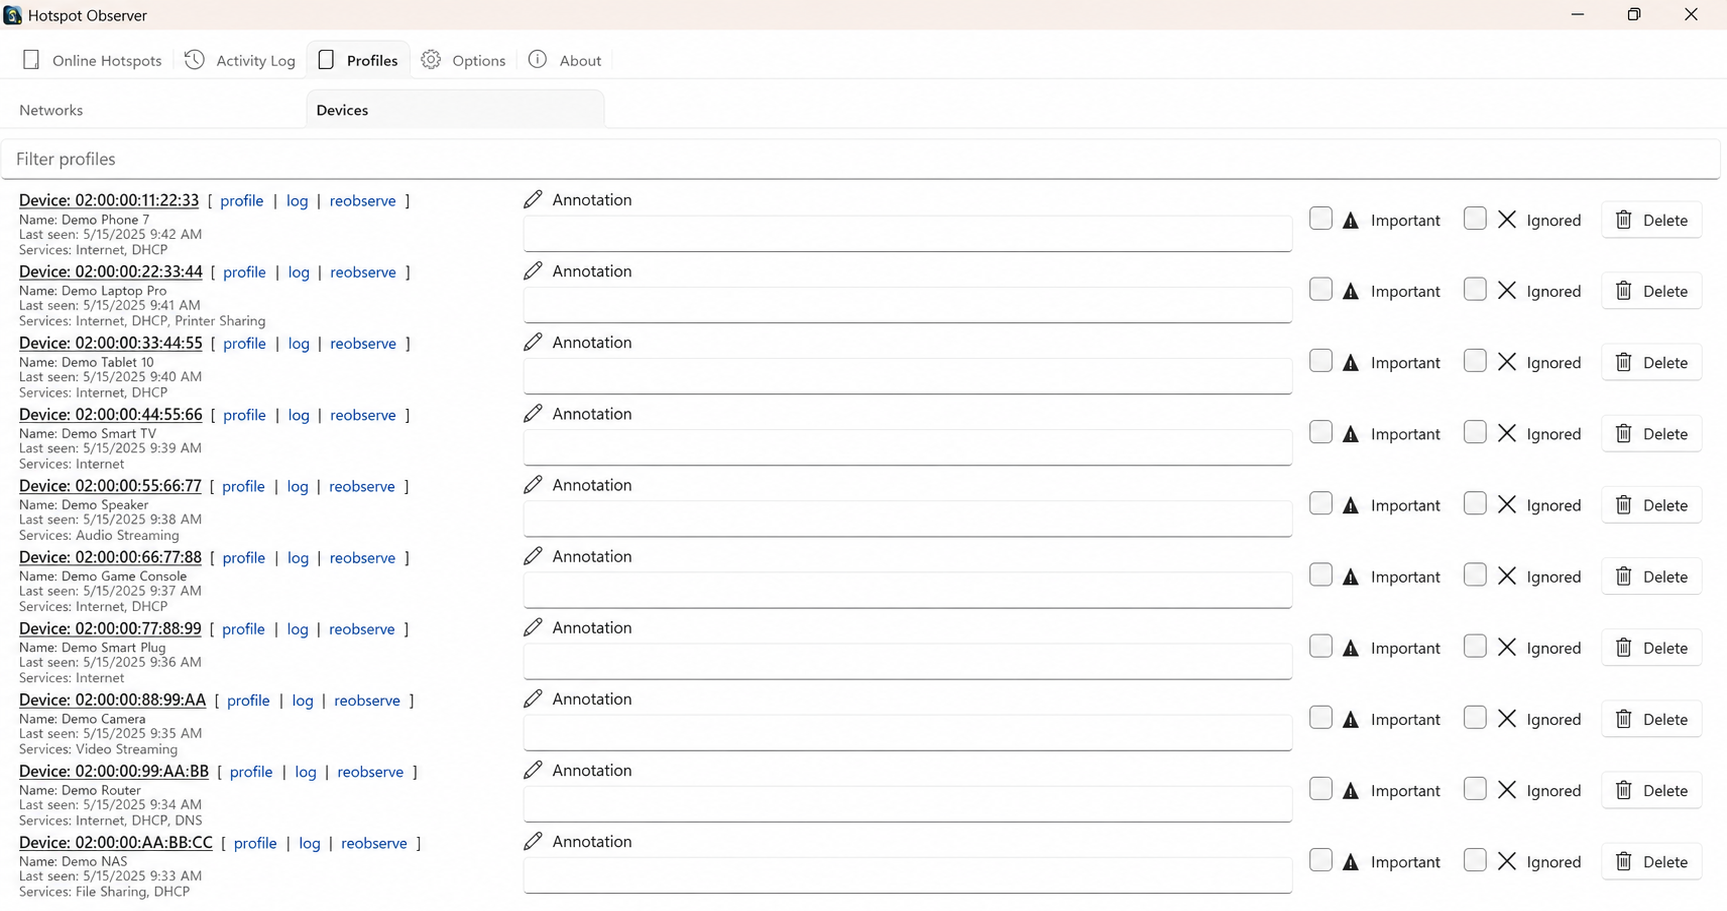
Everyday controlsRead the app in the language you prefer
Understand controls and the offline agreement in your selected language while keeping your current view and saved observations.
Choose in Options
Use the language most comfortable for you. The app follows your system language by default; on Windows, Options → Language lists supported installed display languages. Selecting one changes the interface immediately while dates and numbers follow your regional settings.
Read the agreement
Read the full first-launch agreement in the app language, including its title and controls. It works offline and supports right-to-left reading. Select the acceptance checkbox and Accept and continue when you agree to the terms to open the app. On Windows and Linux, a first installation opens the license-accepted page with a guide link; an update opens Thank you for updating, including updates from older copies without saved version history. Return to the app to begin observing. If the browser cannot open, you can keep using the app; it retries the page on the next launch.
Add a Windows language
If a supported Windows language is missing, use the link beside the selector to open system language settings and install its display language. Reopen the app’s Language list to refresh your choices. On Ubuntu, use the desktop language-settings link.
Contribute if you want to
If you want to create a private catalog, use Options → Language → Contribute a translation with your own Google Cloud Translation project. Review the quota confirmation and possible charges before continuing. Validated progress is saved for resuming; sharing your finished catalog is optional.
Everyday controlsKeep working while the app watches Wi-Fi
Move quickly between evidence, use the tray without reopening every view and decide how automatic Wi-Fi choices fit your work.
Move between tabs
Reach another application tab with Ctrl+Tab, or return to the previous one with Ctrl+Shift+Tab. You can move between questions without restarting your observation.
Open a network notification
Select a network or device notification to bring the app forward and select its row in Visible Hotspots. Search or signal filters that hide the item are cleared so you can see it. If the item is no longer available, its saved profile opens instead.
Refresh the current view
Keep your place as evidence changes. Scanning finishes once observations have been collected; lists, charts and history then prepare separately, so the scan action becomes available before that preparation finishes. Centered Refreshing... indicators have a themed background rectangle and mark only the affected results. Navigation, filters, editable notes and unrelated actions remain usable, including installing a ready update. Activity Log hides its list until refreshing finishes. New entries preserve your reading position; use Scroll to latest to return to the newest entry. Views update affected values while preserving selections, and switching tabs preserves unchanged views and your Feedback draft. Selected rows stay in view after changes; very tall rows can be scrolled within. Press F5 to refresh the selected view or reload Feedback. In About, F5 also checks for and manually obtains a current update.
Use the tray action
Ask for a Wi-Fi choice from the tray’s Re-choose Wi-Fi intelligently or your Options shortcut, even while the window is hidden. It scans for a strictly higher-rated visible network your system can join. The tray’s Try to keep Wi-Fi always connected checkmark shares the Options setting and saves changes made in either place.
Keep Wi-Fi connected
Reduce manual reconnecting with Options → Try to keep Wi-Fi always connected, on by default. With Wi-Fi scanning enabled, it tries the highest-rated currently visible and connectable network when disconnected. Attempts are at least a minute apart. Secured networks with matching saved profiles on the same adapter are eligible, including profiles with a different name. Allow open Wi-Fi networks for automatic connection is off by default, including after upgrading. Enable it to include open networks in automatic reconnection and switching; saved open profiles also require this permission. The option does not change manual tray or shortcut selection. Ignored or absent networks are excluded; the app neither enables a disabled radio nor enters passwords.
Require known internet access
Enable Options → Only connect to networks known to have internet to restrict automatic reconnects and switches to the same network and access point where the app previously observed internet access. This option starts off, including after upgrading. Unknown networks and access points are skipped, even if their credentials are saved. Connect manually once and let the app observe internet access to make one eligible. Manual tray and shortcut selection remain available; past access does not guarantee internet is available now.
Switch automatically
Let the app consider a better candidate with Automatically switch to a better-rated hotspot when one is available, on by default. It uses recommendation ratings, keeps the current connection for equal or lower scores and spaces automatic attempts at least a minute apart. It attempts the target without first forcing a disconnect. If the current network is missing from the scan, it waits for a recovery target. A failed switch checks and, when needed, tries to restore the previous connection; read the outcome in Activity Log.
Coordinate with Windows
To hand automatic selection back to Windows, turn off both automatic options, disable Wi-Fi scanning or quit. While active, the app coordinates saved networks’ automatic preferences to avoid competing choices, preserving credentials. It restores original preferences on exit or recovery after an unexpected exit. Unavailable adapters or interrupted shutdown recovery retain pending restoration for the next launch. If policy or permissions prevent coordination, automatic selection waits and Activity Log explains why.
Protect active transfers
Defer automatic switching during traffic with Only when there are no active transfers, on by default. It waits for two seconds without received or sent traffic on the connected Wi-Fi adapter, including local TCP and UDP. Unknown or reset counters defer switching. Background traffic may delay a switch, and a new transfer after the check can still be interrupted. Turn it off to allow switching during traffic; manual tray and shortcut commands stay immediate.
Resolve a shortcut conflict
If your shortcut conflicts with another app, check its status in Options and choose Ctrl+Shift+W or Alt+Shift+W instead of Ctrl+Alt+W. The tray command gives you the same action without a keyboard combination.
Keep in mind
- A Wi-Fi switch can briefly interrupt connectivity. If there is no better connectable candidate, the current connection stays unchanged.
Help and upkeepGet current fixes with a one-click update
Check for a newer beta and install its verified current package when you are ready for the app to restart.
Check About
Find current fixes and update status in About. Press F5 or select its refresh icon to check now. This manual package transfer uses your current connection, including a metered one, without changing system settings.
Wait for the current installer
Leave the app running while the current installer is prepared. Each package uses one continuous transfer. Automatic transfers wait on explicitly metered or restricted connections; pending updates check for a newer release every 15 seconds so a superseded package is replaced.
Install when ready
Choose Install update once, or activate its update notification, when the current verified package is ready. About shows the starting status while installer preparation runs in the background, leaving the interface responsive. The app checks installer readiness before closing, saves its data, installs and reopens automatically after verifying the installed version. Windows notification and tray cleanup run independently so they cannot hold up shutdown after the installer is ready. Your browser opens Thank you for updating; close that page to return to the app. A failed readiness check leaves the app open with details in Activity Log. A ready installer checks release freshness independently of background refreshes. Already saved verified installers remain installable on metered connections, with release freshness checked again. Windows notifications use your language; sent release alerts are remembered and failed alerts retry while the installer remains ready.
Keep in mind
- Keep the existing app and data until installation succeeds. If an update is already installed, restart an older app process to use the registered version.
Help and upkeepProtect your history and get useful help
Keep the evidence you may need, find help for the symptom you see and share a clear report while protecting personal details.
Keep the evidence you need
Keep observations, notes, preferences and connection history on this computer by choosing persistence and retention in Options. Export important evidence before deleting it or shortening retention. Tools make network requests when started, and update checks contact the website, so some actions need internet access. Read the Privacy statement linked below for local records, online features, website visits and data-removal choices.
Prepare a useful report
Help explain a problem by noting the app version in About, your operating-system version, the action and expected and actual results. After an exception, restart and search Activity Log → Program for Unhandled exception. The app saves exception details before opening its dialog and recovers them after restart even with ordinary history persistence off. Copy or export an available entry to keep its details. Remove personal paths, names, addresses and notes before sharing; you can still report the symptom when no diagnostic entry is available.
Start with the symptom
Start with the closest symptom in Troubleshooting for setup, permissions, scanning, history, connection or update problems. Use Feedback to describe what happened and what you needed. Keep your local data while investigating rather than deleting useful evidence as a first step.
Keep in mind
- Sleep, app closure, missing tracking and failed scans create unknown evidence. They should not be interpreted as proof of a network failure.
Something unexpected?
Start with the closest symptom, keep your saved observations and follow the checks in order.
Find troubleshooting checks →Describe your experience in Feedback →